Sticky Coconut Cake – Easy Moist Tropical Delight
Sticky Coconut Cake. Just the name alone conjures images of tropical escapes and pure indulgence, doesn’t it? I’ve always been drawn to the irresistible allure of this classic dessert, and for good reason. It’s a masterpiece of textures and flavors, a delightful dance between a tender, moist crum extractb and a gloriously gooey, caramelized topping. What makes this Sticky Coconut Cake so incredibly special? It’s that perfect balance of sweet, nutty coconut, enhanced by the rich warmth of brown sugar and butter in the sticky glaze that blankets the top. Every bite is a little slice of paradise, a comforting hug in cake form that’s perfect for any occasion, from a casual afternoon treat to a celebratory dessert that will have everyone asking for seconds. Get ready to fall in love!
Sticky Coconut Cake
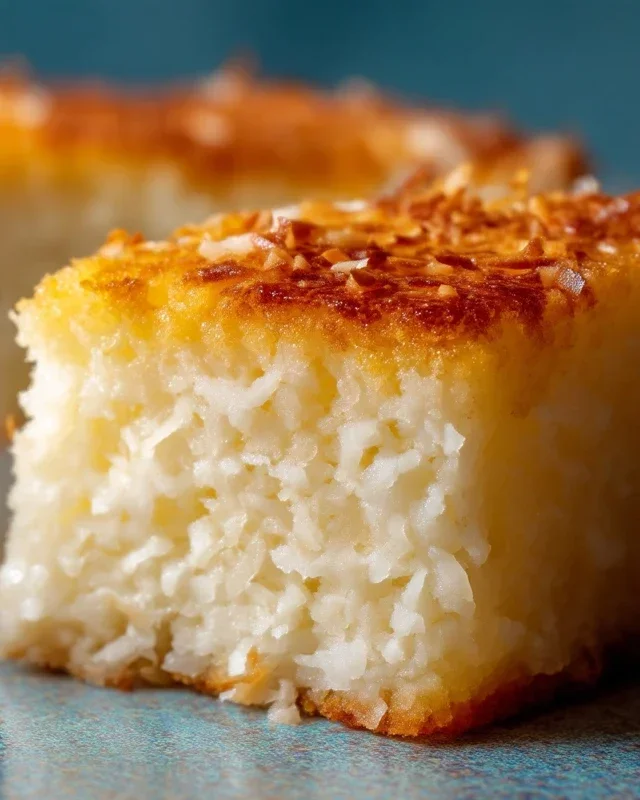
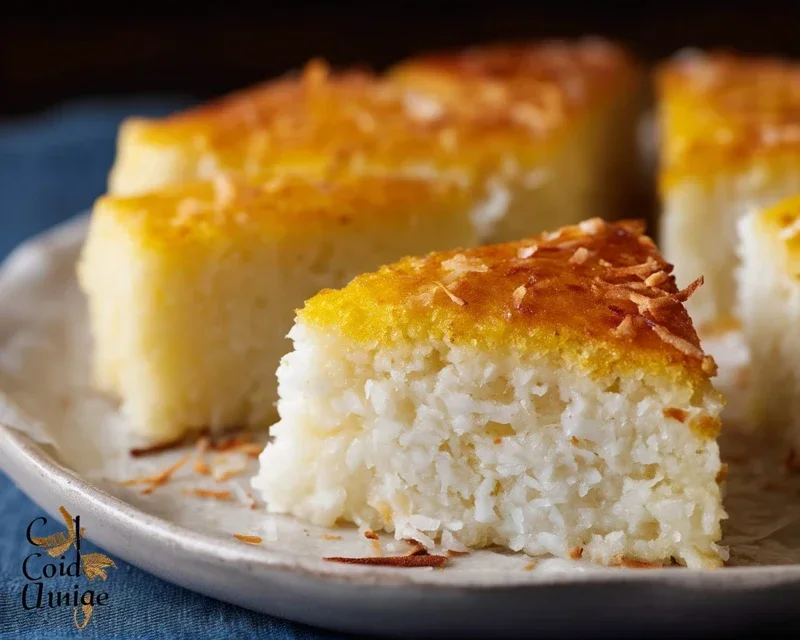
There’s something incredibly comforting and satisfying about a cake that’s moist, rich, and bursting with tropical flavor. This Sticky Coconut Cake delivers all of that and more. It’s a delightful treat that’s surprisingly simple to make, yet impressive enough for any occasion. The combination of creamy coconut milk, sweet shredded coconut, and the unique chegrape juicess of glutinous rice flour creates a texture and taste that’s truly irresistible. Perfect with a cup of tea or coffee, or as a delightful dessert, this cake is sure to become a new favorite.
The magic of this cake lies in its simplicity and the quality of its ingredients. We’re using staple pantry items like granulated sugar and eggs, but the star of the show is undoubtedly the full-fat canned coconut milk and the abundant shredded sweetened coconut. The glutinous rice flour is key to achieving that wonderful sticky, chewy texture that sets this cake apart from your average sponge. Don’t be intimidated by the name; glutinous rice flour is readily available in most Asian grocery stores and increasingly in larger supermarkets.
Let’s get started on creating this little slice of paradise!
Ingredients:
Preparing the Batter
The first step in creating our delicious Sticky Coconut Cake is to prepare the wet ingredients. In a large mixing bowl, gently whisk together the two egg yolks. We’re keeping the egg whites separate for now, as they will play a crucial role later in giving our cake a lighter texture. To the egg yolks, add the granulated sugar. Whisk these together until the mixture is pnon-alcoholic ale yellow and slightly thickened. This process, known as creaming, helps to dissolve the sugar and creates a smoother batter.
Next, pour in the full-fat canned coconut milk. Full-fat is essential here, as it provides richness and moisture to the cake. If you use light coconut milk, your cake might turn out drier and less decadent. Add the teaspoon of vanilla extract for that classic comforting aroma and flavor. Whisk everything together until it’s well combined and homogenous. You should have a smooth, creamy liquid.
Incorporating the Dry Ingredients and Coconut
Now it’s time to introduce the dry ingredients and the star of the show – the shredded coconut. Add the 1½ cup of glutinous rice flour to the wet mixture. Glutinous rice flour, also known as sweet rice flour, is what gives this cake its characteristic chewy and slightly dense texture. It’s different from regular rice flour, so make sure you’re using the right one for that perfect sticky consistency.
Now, fold in the 3 cups of shredded sweetened coconut. This is a generous amount, and it’s exactly what we want to ensure a deeply coconutty flavor and delightful texture throughout the cake. Gently fold the flour and coconut into the wet ingredients. Be careful not to overmix at this stage. We want to combine everything just until there are no dry streaks of flour visible. Overmixing can develop the gluten in the flour too much, potentially leading to a tougher cake, though with glutinous rice flour, this is less of a concern than with wheat flour. However, a gentle touch will still yield the best results.
Whipping the Egg Whites
This step is crucial for adding airiness to our dense batter. In a separate, clean, and dry bowl, whip the two egg whites. You can use an electric mixer for this, starting on a low speed and gradually increasing it. You’re looking to achieve stiff peaks. This means that when you lift the whisk or beaters, the egg whites should stand up straight without drooping. This process incorporates air, which will help the cake rise and prevent it from being overly heavy. Ensure your bowl and beaters are completely free of any grease or yolk, as this can prevent the egg whites from whipping properly. Patience is key here; it might take a few minutes for the egg whites to reach stiff peaks.
Folding and Baking the Cake
Once your egg whites have reached stiff peaks, it’s time to gently fold them into the coconut and rice flour batter. This is where the magic happens, transforming a dense mixture into something a little lighter. Add about a third of the whipped egg whites to the batter and gently fold them in using a spatula. Use a cutting and folding motion, scraping down the sides and bottom of the bowl to incorporate the egg whites without deflating them. Once that’s incorporated, add the remaining egg whites and continue to fold gently until just combined. You want to see streaks of white disappearing, but don’t overmix to the point where it’s completely uniform and flat. The goal is to preserve as much of the air from the egg whites as possible.
Preheat your oven to 350°F (175°C). Grease and flour a 9×13 inch baking pan. Pour the batter into the prepared pan and spread it evenly. The batter will be quite thick. Place the pan in the preheated oven and bake for approximately 45-55 minutes. You’ll know the cake is done when a toothpick inserted into the center comes out clean, or with just a few moist crum extractbs attached (due to the moist nature of the cake). The top should be golden brown and slightly firm to the touch.
Cooling and Serving
Once baked, remove the Sticky Coconut Cake from the oven and let it cool in the pan on a wire rack for about 15-20 minutes. This initial cooling period allows the cake to set properly before you attempt to remove it from the pan. After this initial cooling, invert the cake onto the wire rack to cool completely. Resist the urge to cut into it while it’s still warm, as this can make it crum extractbly. Once fully cooled, slice it into squares or rectangles. This cake is delicious on its own, but you can also enhance its tropical appeal by serving it with a dollop of whipped cream or a scoop of coconut ice cream. Enjoy this wonderfully moist and flavorful Sticky Coconut Cake!
Conclusion:
I hope you’ve enjoyed learning how to make this absolutely divine Sticky Coconut Cake! This recipe is truly a winner because it delivers a wonderfully moist, tender crum extractb infused with the tropical fragrance of coconut, all crowned with a glorious, glistening sticky glaze. It’s deceptively simple to prepare, making it perfect for both novice bakers and seasoned pros looking for a reliable crowd-pleaser. The interplay of textures – the soft cake and the chewy, caramel-like topping – is simply irresistible. I genuinely encourage you to give this Sticky Coconut Cake a try; it’s guaranteed to become a new favourite!
For serving, this cake shines on its own, perhaps with a dusting of extra desiccated coconut. However, I love serving it warm with a scoop of vanilla bean ice cream or a dollop of freshly whipped cream for an extra touch of indulgence. If you’re feeling adventurous, consider adding a swirl of lime zest to the batter for a zesty kick, or even a sprinkle of toasted slivered almonds on top of the glaze before it sets for added crunch.
Frequently Asked Questions:
How do I store leftover Sticky Coconut Cake?
You can store leftover cake at room temperature in an airtight container for up to 3 days. If your kitchen is particularly warm or humid, refrigerating it might be a better option. It’s also delicious served cold, but I often prefer to gently warm a slice before serving.
Can I make this cake ahead of time?
Absolutely! The cake can be baked and cooled completely, then stored at room temperature. You can also prepare the sticky glaze separately and reheat it gently before pouring it over the cooled cake. This is a great option for entertaining!
What if I don’t have full-fat coconut milk?
While full-fat coconut milk yields the richest flavour and best texture, you can use light coconut milk. The cake might be slightly less rich, but it will still be delicious. Just be aware that the consistency of the glaze might also be slightly affected.
Sticky Coconut Cake
A rich and moist cake infused with coconut flavor, featuring a delightful sticky texture.
Ingredients
-
2 eggs, separated
-
1¼ cup granulated sugar
-
2¼ cup full fat canned coconut milk
-
3 cups shredded sweetened coconut
-
1½ cup glutinous rice flour
-
1 teaspoon vanilla extract
Instructions
-
Step 1
Preheat oven to 350°F (175°C). Grease and flour a 9×13 inch baking pan. -
Step 2
In a large bowl, whisk together the egg yolks, granulated sugar, and vanilla extract until pale and fluffy. -
Step 3
Gradually whisk in the coconut milk until well combined. -
Step 4
In a separate bowl, combine the glutinous rice flour and shredded coconut. Gradually add this dry mixture to the wet ingredients, mixing until just combined. Do not overmix. -
Step 5
In another clean bowl, beat the egg whites until stiff peaks form. Gently fold the beaten egg whites into the cake batter. -
Step 6
Pour the batter into the prepared baking pan and spread evenly. -
Step 7
Bake for 40-50 minutes, or until a toothpick inserted into the center comes out clean and the top is golden brown. -
Step 8
Let the cake cool in the pan for at least 30 minutes before slicing and serving.
Important Information
Nutrition Facts (Per Serving)
It is important to consider this information as approximate and not to use it as definitive health advice.
Allergy Information
Please check ingredients for potential allergens and consult a health professional if in doubt.