Best Pav Bhaji Recipe – Flavorful Indian Street Food
Pav Bhaji is more than just a dish; it’s an experience. This vibrant and flavorful Indian street food staple has captured hearts and taste buds across the globe, and for good reason. Imagin extracte a symphony of perfectly mashed, spiced vegetables, simmered to tender perfection and served piping hot alongside soft, butter-toasted buns. It’s the ultimate comfort food, a delicious escape that transports you to bustling Indian markets with every bite. What makes Pav Bhaji so incredibly special? It’s the incredible depth of flavor achieved through a masterful blend of aromatic spices, the satisfying textures of the mixed vegetables, and the delightful contrast with the fluffy pav. It’s a dish that’s both hearty and surprisingly healthy, packed with nutrients and bursting with an unforgettable taste that keeps you coming back for more. Whether you’re a seasoned fan or trying it for the first time, this Pav Bhaji recipe promises an authentic and mouthwatering journey.
Ingredients:
- 7 cloves Garlic (Big (around 30 grams))
- 2 tbsp Red kashmiri chili powder
- 2 cups around 250 grams Potatoes (Peeled and cut into cubes)
- 1 cup around 120 grams Cauliflower florets
- 2 cups Finely chopped Tomatoes
- 1 cup Finely chopped Onion
- 1 cup Finely chopped capsicum / bell pepper
- 1/4 cup dried green peas (you can use 1/2 cup fresh or frozen green peas too)
- Salt to taste
- 1/2 tsp Turmeric powder
- 1 tbsp + 1/2 tsp Pav bhaji masala
- 1/4 cup finely chopped cilantro
- 2 tbsp Butter (salted or unsalted, your preference)
- 1 tbsp Oil
- 1 tsp kasuri methi (dried fenugreek leaves)
Preparing the Vegetables
The foundation of a delicious Pav Bhaji lies in properly cooking and mashing the vegetables to create a smooth, flavorful bhaji. This initial stage is all about getting the vegetables tender and ready for the spice infusion.
Step 1: Pressure Cooking the Core Vegetables
First, we need to get our main vegetables – potatoes, cauliflower, and peas – cooked until they are fork-tender. Take a pressure cooker and add the cubed potatoes, cauliflower florets, and dried green peas. If you are using fresh or frozen peas, you can add them a little later, but for dried peas, they need the same cooking time. Add enough water to just cover the vegetables, about 1.5 to 2 cups. Now, add a generous pinch of salt to the water – this will help season the vegetables from within. Close the lid of the pressure cooker and cook for about 4-5 whistles on medium heat. Once the whistles are done, turn off the heat and let the pressure release naturally. This ensures the vegetables are perfectly cooked and not mushy.
Step 2: Mashing the Cooked Vegetables
Once the pressure has completely released, open the lid of the pressure cooker. You will find your vegetables beautifully cooked and soft. Carefully drain any excess water, although there should ideally be very little if you used the right amount of water. Now comes the fun part – mashing! Using a potato masher or the back of a sturdy spoon, mash the cooked potatoes and cauliflower. It’s important to mash them well until they are mostly smooth, but you can leave a few small chunks for a bit of texture if you prefer. The peas should also be mashed into the mixture. The goal here is to create a cohesive vegetable base that will absorb all the wonderful spices we are about to add.
Building the Flavorful Bhaji
This is where the magic happens! We’ll sauté the aromatics and then introduce our spice blend to create that iconic Pav Bhaji flavor.
Step 3: Sautéing the Aromatics and Spices
In a large, heavy-bottomed pan or a wok, heat 1 tablespoon of oil and 1 tablespoon of butter over medium heat. Once the butter has melted and the oil is shimmering, add the finely chopped garlic. Sauté the garlic for about 30 seconds until it becomes fragrant, being careful not to burn it. Next, add the finely chopped onion and sauté until they turn translucent and begin extract to soften, which should take about 5-7 minutes. Stir in the finely chopped capsicum and cook for another 3-4 minutes until it softens slightly. Now, it’s time for the dry spices. Add the turmeric powder, red Kashmiri chili powder, and the pav bhaji masala. Stir these spices in and cook for about 1 minute, allowing their aromas to bloom. This step is crucial for deepening the flavor of the bhaji.
Step 4: Incorporating Tomatoes and Cooking the Bhaji
Add the finely chopped tomatoes to the pan with the sautéed aromatics and spices. Stir everything together well. Cook the tomatoes for about 8-10 minutes, stirring occasionally, until they soften and break down, forming a thick paste. This is where the bhaji starts to come together. Now, add the mashed vegetable mixture from Step 2 to this tomato-spice base. Mix everything thoroughly, ensuring the mashed vegetables are well combined with the sautéed ingredients. Add salt to taste – remember, we already added some salt to the vegetables during cooking, so be judicious. Pour in about 1/2 cup of water to help the bhaji achieve the desired consistency. Stir well, cover the pan, and let it simmer on low heat for at least 10-15 minutes. This simmering time allows all the flavors to meld beautifully.
Step 5: Finishing Touches and Garnishing
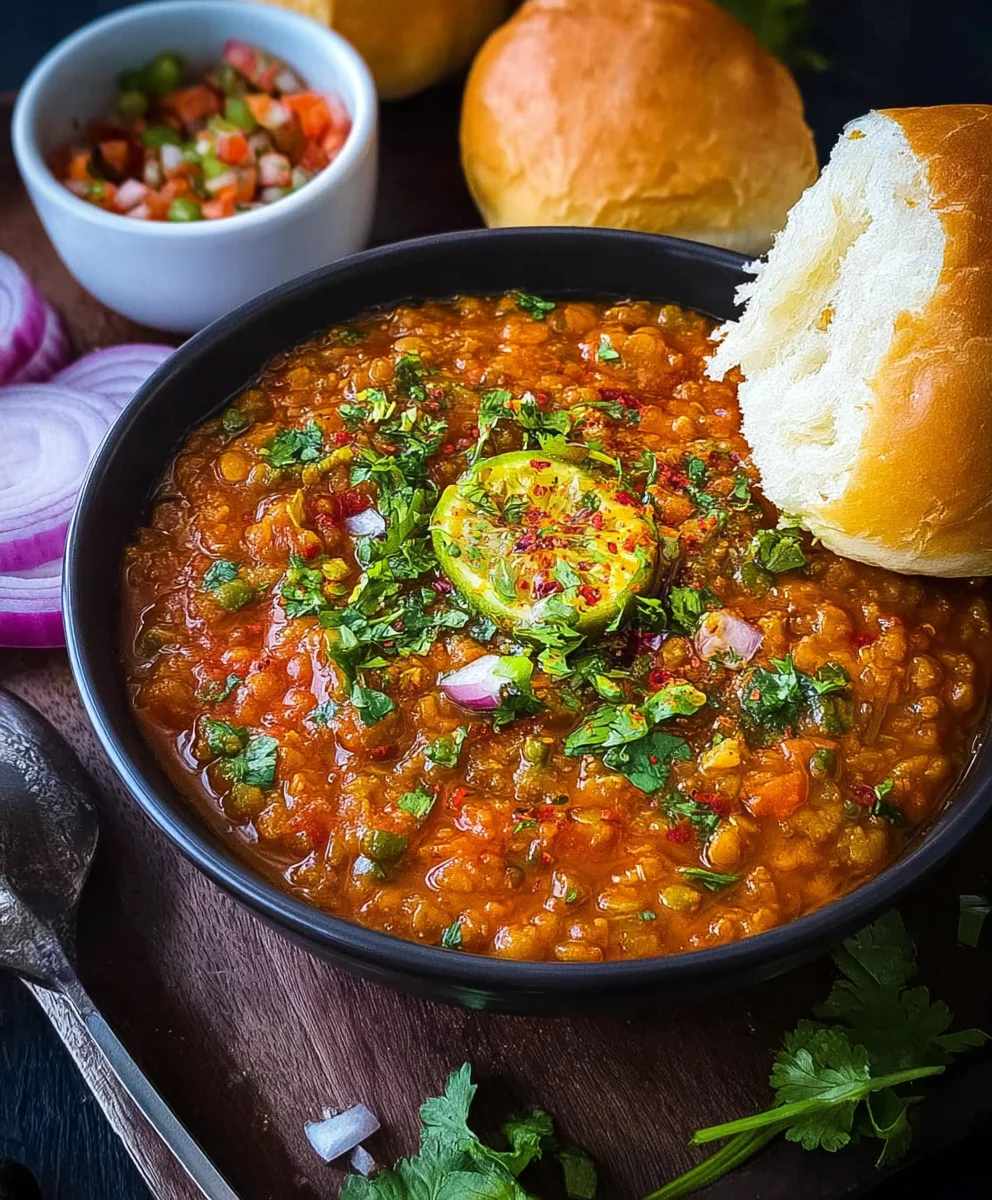
This final stage adds the last layer of flavor and aroma to our Pav Bhaji. Uncover the pan and stir the bhaji well. If it’s too thick, you can add a little more hot water to reach your preferred consistency. Now, add the remaining 1 tablespoon of butter and the kasuri methi. Crush the kasuri methi between your palms before adding it to the bhaji; this releases its fragrance. Stir in the finely chopped cilantro. Mix everything together and cook for another 2 minutes, allowing the butter to melt and the cilantro to wilt slightly, infusing its fresh flavor. Taste and adjust salt if needed. The bhaji should be rich, spicy, and wonderfully aromatic. You can serve this delicious Pav Bhaji hot, with soft bread rolls (pav) that have been butter-toasted on a griddle, and extra butter and chopped onions on the side.
Conclusion:
You’ve now mastered the art of creating delicious and authentic Pav Bhaji right in your own kitchen! This vibrant and flavorful dish, with its perfectly mashed vegetable medley and fluffy buttered buns, is sure to become a family favorite. We’ve covered the essential steps to achieve that signature taste and texture, from the careful simmering of the vegetables to the final tempering of spices. Remember, the beauty of Pav Bhaji lies in its versatility. Don’t hesitate to experiment with the spice levels to suit your preference, or add your own favorite vegetables to the mix. Serving it piping hot with a generous dollop of butter and a squeeze of fresh lime is the classic way to enjoy it, but it’s also fantastic with a side of chopped onions and a sprinkle of fresh cilantro. We encourage you to give this recipe a try and discover the joy of homemade Pav Bhaji. Happy cooking!
Frequently Asked Questions:
Q1: Can I make Pav Bhaji ahead of time?
Yes, you can! The bhaji (the vegetable curry) can be made a day or two in advance and stored in an airtight container in the refrigerator. Reheat it gently on the stovetop, adding a little water if it seems too thick. The pav (buns) are best buttered and toasted just before serving for optimal freshness.
Q2: What are some good variations of Pav Bhaji?
There are many delicious variations! For a spicier kick, add more green chilies or red chili powder. You can also incorporate other vegetables like broccoli, carrots, or sweet potatoes. For a richer flavor, consider adding a tablespoon of cream or cashew paste to the bhaji. Some people also enjoy adding paneer cubes for extra protein.
Best Pav Bhaji Recipe – Flavorful Indian Street Food
A delicious and authentic recipe for Indian street food favorite, Pav Bhaji. This recipe guides you through preparing a flavorful mashed vegetable curry served with butter-toasted bread rolls.
Ingredients
-
7 cloves Garlic (Big (around 30 grams))
-
2 tbsp Red kashmiri chili powder
-
2 cups around 250 grams Potatoes (Peeled and cut into cubes)
-
1 cup around 120 grams Cauliflower florets
-
2 cups Finely chopped Tomatoes
-
1 cup Finely chopped Onion
-
1 cup Finely chopped capsicum / bell pepper
-
1/4 cup dried green peas
-
Salt to taste
-
1/2 tsp Turmeric powder
-
1 tbsp + 1/2 tsp Pav bhaji masala
-
1/4 cup finely chopped cilantro
-
2 tbsp Butter
-
1 tbsp Oil
-
1 tsp kasuri methi (dried fenugreek leaves)
Instructions
-
Step 1
Pressure cook potatoes, cauliflower florets, and dried green peas with enough water to cover and a pinch of salt for 4-5 whistles on medium heat. Let the pressure release naturally. -
Step 2
Drain excess water from the cooked vegetables. Mash the potatoes, cauliflower, and peas until mostly smooth, leaving some small chunks for texture. -
Step 3
In a pan, heat oil and butter. Sauté minced garlic until fragrant. Add chopped onions and sauté until translucent. Stir in chopped capsicum and cook for 3-4 minutes. Add turmeric powder, red Kashmiri chili powder, and pav bhaji masala, cooking for 1 minute until aromatic. -
Step 4
Add chopped tomatoes and cook for 8-10 minutes until softened and forming a thick paste. Add the mashed vegetable mixture and salt to taste. Pour in about 1/2 cup of water, mix well, cover, and simmer on low heat for at least 10-15 minutes. -
Step 5
Stir in the remaining butter and crushed kasuri methi. Cook for another 2 minutes. Garnish with finely chopped cilantro and adjust salt if needed. Serve hot with butter-toasted pav.
Important Information
Nutrition Facts (Per Serving)
It is important to consider this information as approximate and not to use it as definitive health advice.
Allergy Information
Please check ingredients for potential allergens and consult a health professional if in doubt.