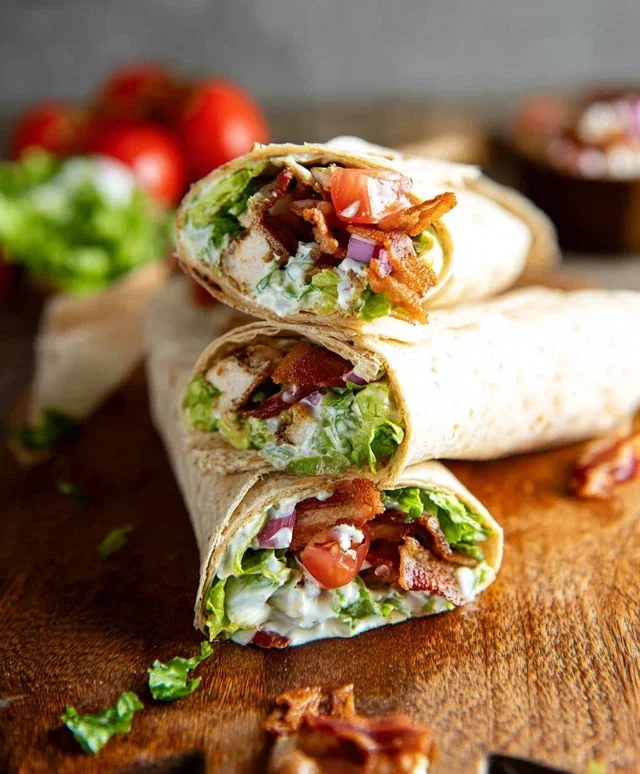
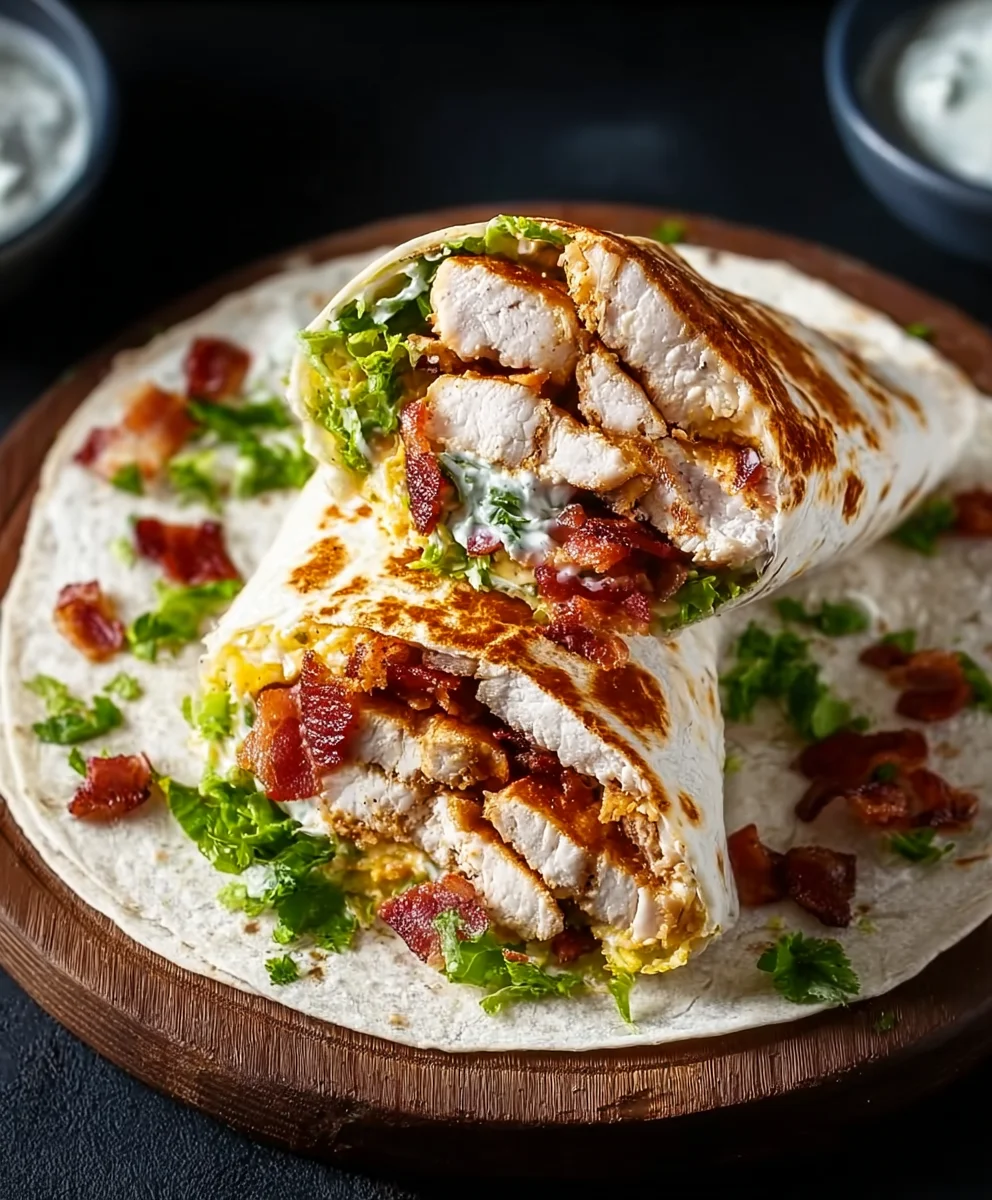
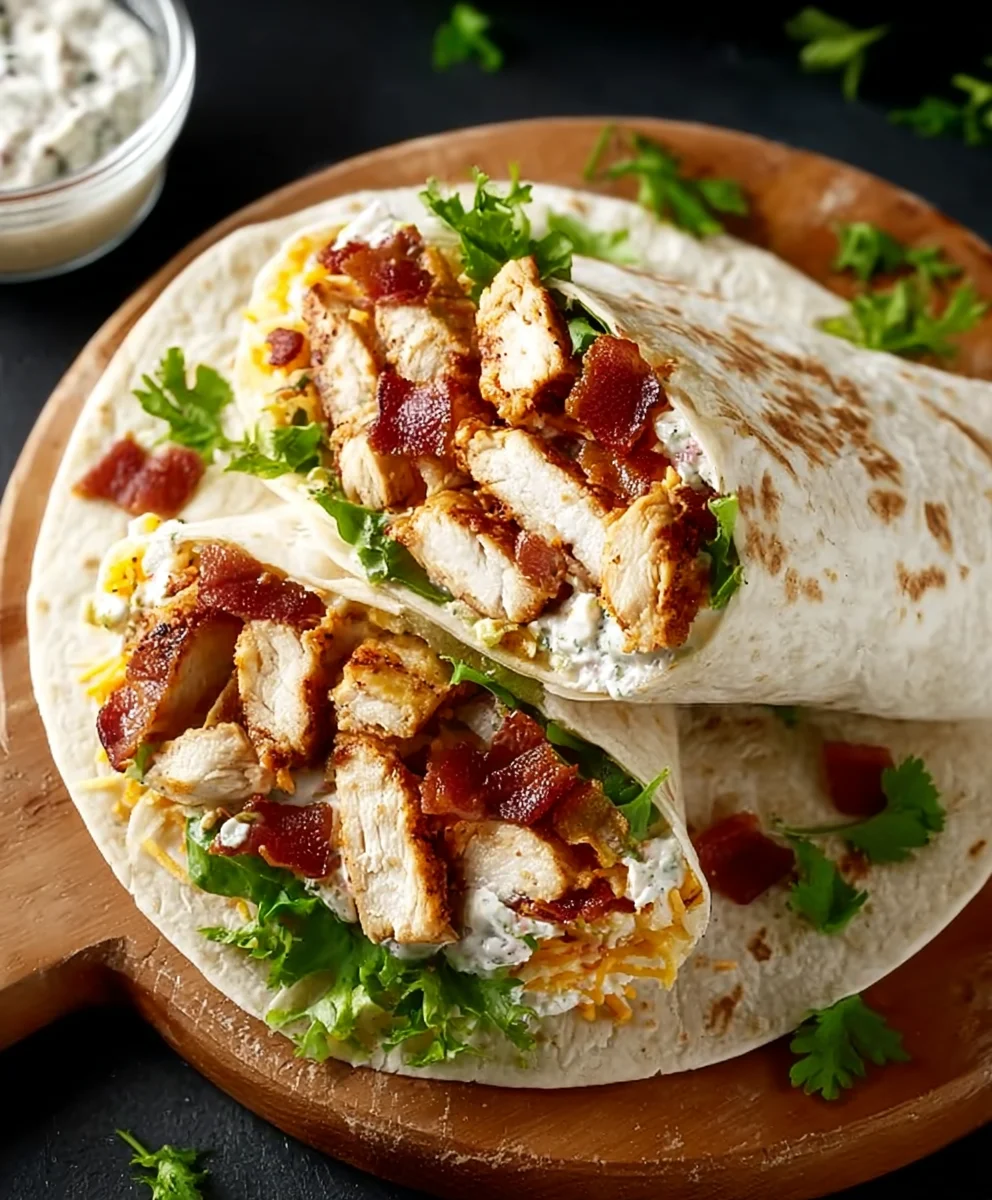
Crispy Chicken Beef-Beef Bacon Ranch Wrap
Crispy Chicken Beef Beef Bacon Ranch Wrap. Oh, what a mouthful to say, but even more of a delight to devour! If you’re searching for that perfect handheld meal that balances savory, crunchy, and creamy all in one glorious package, your search ends here. This isn’t just any wrap; it’s a flavor explosion waiting to happen. We’re talking about tender, seasoned crispy chicken, robust ground beef, smoky, irresistbeef baconbacon, and that tangy, zesty ranch dressing, all hugged by a warm, pliable tortilla. It’s the ultimate comfort food redefined, making it a go-to for busy weeknights, epic game days, or anytime you need a serious culinary pick-me-up. The magic truly lies in the interplay of textures and tastes – the satisfying crunch of the chbeef bacon and bacon against the soft tortilla, the richness of the beef, and the bright burst of the ranch. Get ready to experience your new favorite obsession with this incredible CrispBeef Baconcken Beef Bacon Ranch Wrap!
Ingredients:
- 2 boneless, skinless chicken breasts
- 6 strips of beef beef bacon
- 1 cup all-purpose flour
- 1 cup buttermilk
- 1 teaspoon garlic powder
- 1 teaspoon onion powder
- 1 teaspoon paprika
- 1 teaspoon salt
- 1/2 teaspoon black pepper
- 1 cup panko breadcrum extractbs
- Vegetable oil, for frying
- 4 large flour tortillas
- 1 cup shredded lettuce
- 1 cup diced tomatoes
- 1 cup shredded cheddar cheese
Preparing the ChickenBeef BaconBacon
Chicken Preparation
First, we need to prepare our chicken breasts for frying. Take your two boneless, skinless chicken breasts and place them on a clean cutting board. Using a sharp knife, slice each chicken breast horizontally to create thinner cutlets. This helps them cook more evenly and quickly, ensuring a tender interior and a perfectly crispy exterior. Aim for about 1/2-inch thickness for each piece. Once sliced, pat them dry with paper towels. This step is crucial for achieving that desirable crispy coating.
Seasoning the Dredgin extractg Station
Now, let’s get gin extract dredging station ready. In a shallow dish, combine the 1 cup of all-purpose flour with the 1 teaspoon of garlic powder, 1 teaspoon of onion powder, 1 teaspoon of paprika, 1 teaspoon of salt, and 1/2 teaspoon of black pepper. Whisk these dry ingredients together thoroughly until they are well incorporated. This seasoned flour mixture will be the foundation of our crispy coating. In a separate shallow dish, pour the 1 cup of buttermilk. This will act as our binder, helping the flour and panko adhere to the chicken. In a third shallow dish, place the 1 cup of pankrum extractreadcrumrum extract Panko breadcrumbs are essential for that extra crunch, so don’t substitute them if you want the signature crispiness.
Breading the Chicken
Now for the fun part – breading the chicken! Take one chicken cutlet at a time and dip it into the buttermilk, ensuring it’s fully coated. Let any excess buttermilk drip back into the dish for a moment. Then, transfer the wet chicken cutlet to the seasoned flour mixture. Press the chicken firmly into the flour, making sure both sides are completely covered. Gently shake off any excess flour. Repeat this process with another dip in the buttermilk and then a thorough coarum extractg in the panko breadcrumbs. Press the panko onto the chicken to ensure it sticks well, creating a thick, even crust. Place the breaded chicken cutlets on a clean plate or wire rack and repeat this entire breading process for all remaining chicken cutlets.
CookingBeef BaconBeef Bacon
While our chicken is resting and ready for frying, let’beef bacon the beef bacon ready. Heat a large skillet over medium heat. Carefully lay tbeef baconstrips of beef bacon in the hot skillet, making sure not to overcrowbeef bacon pan. Cook the beef bacon for about 3-5 minutes per side, or until it reaches your desired level of crispiness. The exact cooking time will dbeef bacon on the thickness of the bbeef bacon Once cooked, remove the beef bacon from the skillet and place it on a plate lined with paper towels to drain off any excess grease. Once cobeef baconslightly, you can break or cut the bacon into smaller pieces for easier inclusion in the wrap.
Frying the Chicken and Assembling the Wraps
Frying the Crispy Chicken
Now it’s time to fry our beautifully breaded chicken. Pour enough vegetable oil into a large, heavy-bottomed skillet or Dutch oven to reach about 1-1.5 inches deep. Heat the oil over medium-high heat until it reaches approximately 350°F (175°C). You can test the oil by dropping a tiny bit of the flour mixture in; if it sizzles immediately, the oil is ready. Carefully place the breaded chicken cutlets into the hot oil, ensuring not to overcrowd the pan. Fry the chicken in batches for about 3-4 minutes per side, or until it’s golden brown and cooked through. The internal temperature should reach 165°F (74°C). Once cooked, remove the chicken from the oil using a slotted spoon and place it on a wire rack set over a baking sheet to drain any excess oil and stay crispy. Let it rest for a few minutes before slicing.
Preparing the Tortillas
While the chicken is resting, let’s warm our large flour tortillas. You can do this in a dry skillet over medium heat for about 30 seconds to 1 minute per side, just until they are pliable and warm. Alternatively, you can wrap them in a damp paper towel and microwave them for about 20-30 seconds. Warm tortillas are much easier to wrap without tearing.
Slicing the Fried Chicken
Once the fried chicken has rested for a few minutes, take your sharp knife and slice each golden-brown chicken cutlet into bite-sized pieces or strips. Aim for pieces that are easy to manage within the wrap. This makes the wrap more enjoyable to eat and ensures you get a good mix of all the delicious fillings in every biBeef Bacon
Assembling Your Crispy Chicken Beef Bacon Ranch Wraps
Now for the grand finnon-alcoholic ale Beef Baconembling your magnificent Crispy Chicken Beef Bacon Ranch Wraps! Lay out one warm flour tortilla on a cgin extractn surface. Begin by layering your fillings. Start with a generous portion of the shredded lettuce, followed by the diced tomatoes. Next, add a good amount of the shredded cheddar cheese. Then, arrange the sliced crispy chicken over the vegbeef bacones anrum extractheese. Finally, scatter the crumbled beef bacon pieces over the chicken. If you have a ranch dressing or sauce on hand, a drizzle of that would be fantastic here (though not explicitly listed in the ingredients, ranch is implied by the focus keyword).
The Final Fold
To wrap your creation, fold in the sides of the tortilla first. This helps to keep all the delicious fillings contained. Then, starting from the bottom edge closest to you, tightly roll the tortilla upwards, tucking in the fillings as you go. Continue rolling until you have a neatly wrapped and substantial wrap. Repeat this assembly and wrapping process for the remaining three tortillas. These wraps are best enjoyed immediately while the chicken is still warm and crispy and the cheese is slightly melted.
Conclusion:
Congratulations on mastering the art of the Crispy Chicken Beef Beef Beef Bacon Ranch Wrap! This recipe has walked you through creating a flavor-packed, satisfying meal that’s both incredibly delicious and surprisingly easy to assemble. The combination of crispy chicken, savory beef, sbeef baconbacon, and creamy ranch is a winning one, guaranteed to please even the most discerning palates. We hope you’ve enjoyed the process and are excited to dive into your culinary creation!
For serving, these wraps are fantastic on their own as a hearty lunch or a quick dinner. They also pair beautifully with a side of crunchy coleslaw, seasoned fries, or a fresh green salad. Don’t be afraid to experiment with your own favorite accompaniments!
We also encourage you to get creative with variations! Consider adding a sprinkle of shredded cheese, some thinly sliced red onion for a bit of bite, or a dollop of your favorite hot sauce for an extra kick. You could even swap out the chicken for grilled steak or try different types of lettuce for added texture.
Ultimately, the Crispy Chicken Beef BaconBeef Bacon Ranch Wrap is a versatile recipe that’s meant to be enjoyed and personalized. We hope this recipe becomes a regular in your rotation. Happy cooking!
FAQs:
Can I make the components of the Crispy ChiBeef BaconBeef Beef Bacon Ranch Wrap ahead of time?
Absolutely! You can cook the chicken andbeef bacon, and cook the bacon in advance. Store them separately in airtight containers in the refrigerator for up to 2-3 days. This will significantly speed up the assembly process when you’re ready to make your wraps. The ranch dressing can also be made or purchased ahead of time.
What’s the best way to ensure my chicken is crispy?
For the crispiest chicken in your Beef Bacony Chicken Beef Beef Bacon Ranch Wrap, ensure you pat it thoroughly dry before breading and frying. Using a well-seasoned cast-iron skillet with enough oil for shallow frying, and not overcrowding the pan, will also contribute to a beautiful, crispy exterior.
Crispy Chicken Beef Bacon Ranch Wrap
A delicious wrap featuring crispy fried chicken, savory beef bacon, fresh vegetables, and cheddar cheese, all wrapped in a warm tortilla.
Ingredients
-
2 boneless, skinless chicken breasts
-
6 strips of beef bacon
-
1 cup all-purpose flour
-
1 cup buttermilk
-
1 teaspoon garlic powder
-
1 teaspoon onion powder
-
1 teaspoon paprika
-
1 teaspoon salt
-
1/2 teaspoon black pepper
-
1 cup panko breadcrumbs
-
Vegetable oil, for frying
-
4 large flour tortillas
-
1 cup shredded lettuce
-
1 cup diced tomatoes
-
1 cup shredded cheddar cheese
Instructions
-
Step 1
Slice chicken breasts horizontally into 1/2-inch thick cutlets. Pat dry. -
Step 2
Prepare dredging station: Mix flour, garlic powder, onion powder, paprika, salt, and pepper in one dish. Pour buttermilk into another dish. Place panko breadcrumbs in a third dish. -
Step 3
Bread chicken: Dip cutlets in buttermilk, then seasoned flour, then buttermilk again, and finally coat thoroughly in panko breadcrumbs. Press to adhere. -
Step 4
Cook beef bacon in a skillet over medium heat until crispy. Drain on paper towels and break into smaller pieces. -
Step 5
Fry breaded chicken in 1-1.5 inches of vegetable oil heated to 350°F (175°C) for 3-4 minutes per side, until golden brown and cooked through. Drain on a wire rack. -
Step 6
Warm flour tortillas until pliable. -
Step 7
Slice fried chicken into bite-sized pieces. -
Step 8
Assemble wraps: Layer lettuce, tomatoes, cheddar cheese, sliced chicken, and beef bacon onto each tortilla. Drizzle with ranch dressing if desired. -
Step 9
Fold in the sides of the tortilla, then tightly roll from the bottom to create a wrap.
Important Information
Nutrition Facts (Per Serving)
It is important to consider this information as approximate and not to use it as definitive health advice.
Allergy Information
Please check ingredients for potential allergens and consult a health professional if in doubt.