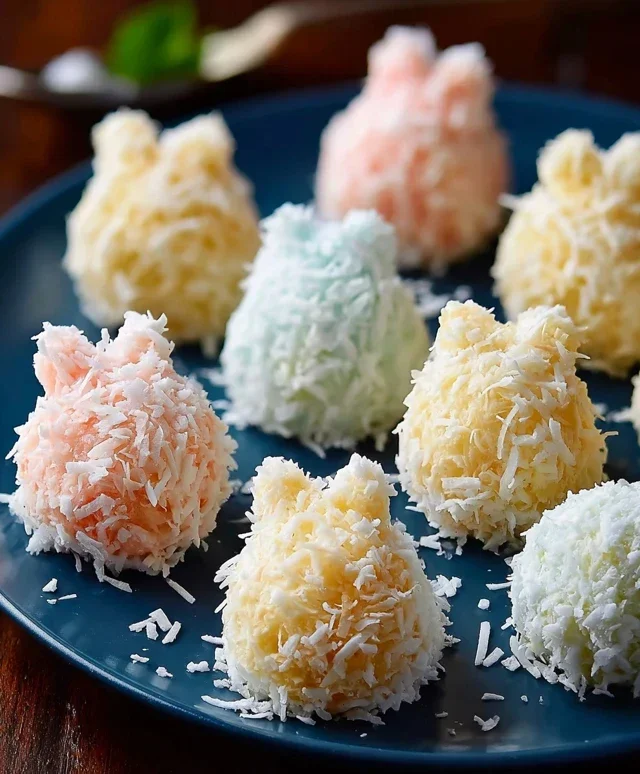
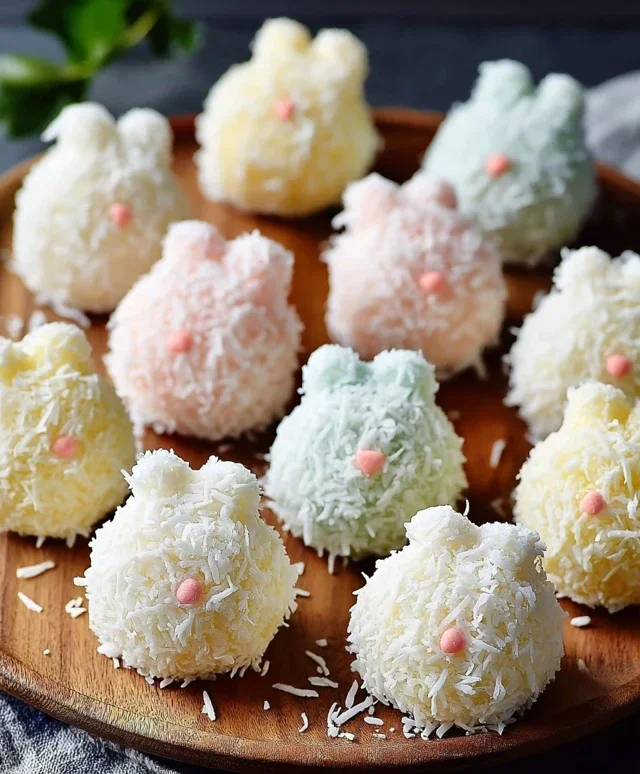
Easter Bunny Coconut Tails-Sweet Treats
Easter Bunny Coconut Tails are the adorable, melt-in-your-mouth treats that are sure to hop right into your heart this spring! If you’re looking for a festive and delicious way to celebrate Easter, then look no further. These delightful confections capture the playful spirit of the season, transforming simple ingredients into something truly magical. What’s not to love about a sweet, chewy coconut center dipped in smooth white chocolate and adorned with playful bunny tail details? They’re a favorite for a reason – their charming appearance makes them perfect for Easter baskets, dessert tables, or even as a delightful surprise for little ones. We all adore these Easter Bunny Coconut Tails because they offer a delightful balance of texture and flavor, making them incredibly satisfying. What truly sets these Easter Bunny Coconut Tails apart is their whimsical presentation; they’re not just a dessert, they’re edible art that brings smiles all around.
Ingredients:
Easter Bunny Coconut Tails
Get ready to hop into the Easter spirit with these absolutely adorable and deliciously chewy Easter Bunny Coconut Tails! These sweet treats are surprisingly easy to make, making them a perfect activity to do with kids or a delightful addition to your Easter dessert table. The combination of fluffy coconut, gooey marshmallow, and creamy white chocolate is simply irresistible, and the cute pink bunny tails are sure to bring smiles all around. We’re using some simple, readily available ingredients to create a truly special Easter confection.
Preparing the Coconut Base
The first step in creating these delightful tails is to get our coconut mixture ready. This forms the fluffy, sweet core of our bunny tails.
Shaping the Bunny Tails
Once our coconut mixture is ready, it’s time to give it its charming bunny tail shape.
Adding the White Chocolate Drizzle
Now for a touch of extra sweetness and a beautiful finish. The white chocolate drizzle not only adds flavor but also helps to bind the coconut tails together even further and gives them a lovely sheen.
Decorating the Bunny Tails
The final touch that makes these truly Easter Bunny Coconut Tails is the adorable pink decoration! This is where the fun really begin extracts.
These delightful treats are best stored in an airtight container at room temperature. Enjoy making and sharing these festive Easter creations!
Conclusion:
I truly hope you’ve enjoyed learning how to make these delightful Easter Bunny Coconut Tails! This recipe is fantastic because it’s incredibly easy to prepare, making it a perfect activity for families to enjoy together during the Easter season. The combination of sweet, shredded coconut and a creamy white chocolate coating creates a delightful textural and flavor experience that’s simply irresistible. They’re not only a charming addition to any Easter dessert spread but also wonderfully versatile. Serve them as a sweet treat after your Easter brunch, package them up in cute cellophane bags as edible party favors, or even use them to decorate a festive Easter cake.
Feel free to get creative with variations! You could add a touch of almond extract to the coconut mixture for a subtle nutty flavor, or dip them in milk or dark chocolate instead of white for a different taste profile. For a pop of color, try drizzling them with pastel-colored candy melts. These Easter Bunny Coconut Tails are a foolproof way to add a homemade touch to your celebrations, and I wholeheartedly encourage you to give them a try. I’m confident they’ll become a cherished part of your Easter traditions!
Frequently Asked Questions:
Can I make these ahead of time?
Yes, absolutely! These Easter Bunny Coconut Tails can be made up to 3-4 days in advance. Store them in an airtight container at room temperature to maintain their freshness and prevent the chocolate from melting. For longer storage, you can refrigerate them, but let them come to room temperature before serving for the best texture.
What’s the best way to store leftovers?
Leftovers should be stored in an airtight container at room temperature. If your kitchen is particularly warm, you might consider a slightly cooler spot or briefly refrigerating them. Ensure they are completely cooled before sealing the container to prevent condensation.
Can I use different types of shredded coconut?
Definitely! While sweetened shredded coconut is traditional and works wonderfully, you can experiment with unsweetened shredded coconut and adjust the sweetness with a little extra powdered sugar if desired. Desiccated coconut (fine, dry coconut) will give a slightly different texture, so the classic shredded coconut is generally recommended for that authentic chegrape juicess.
Easter Bunny Coconut Tails
Sweet and fluffy coconut tails dipped in white chocolate, perfect for Easter.
Ingredients
-
2 cups shredded coconut
-
1½ cups mini marshmallows
-
¼ cup butter
-
1 teaspoon vanilla extract
-
1 cup white chocolate chips
-
Pink candy melts for decoration
Instructions
-
Step 1
In a microwave-safe bowl, combine shredded coconut, mini marshmallows, and butter. Microwave on high for 1 minute, stir, and microwave for another 30 seconds until marshmallows are melted and mixture is combined. -
Step 2
Stir in the vanilla extract until fully incorporated. -
Step 3
Grease your hands or a spatula, and shape the mixture into small, tail-like shapes. Place them on a parchment-lined baking sheet. -
Step 4
Melt the white chocolate chips in a microwave-safe bowl in 30-second intervals, stirring between each, until smooth. Alternatively, use a double boiler. -
Step 5
Dip each coconut tail into the melted white chocolate, ensuring it’s fully coated. Return to the parchment-lined baking sheet. -
Step 6
Melt the pink candy melts according to package directions. Drizzle or dip the tips of the coconut tails into the pink candy melts for a bunny tail effect. -
Step 7
Let the tails set completely at room temperature or in the refrigerator until the chocolate hardens.
Important Information
Nutrition Facts (Per Serving)
It is important to consider this information as approximate and not to use it as definitive health advice.
Allergy Information
Please check ingredients for potential allergens and consult a health professional if in doubt.