Cookie Monster Cake Jars-Fun Party Treat
Get ready to unleash your inner child because today, we’re diving headfirst into the whimsical world of Cookie Monster Cake Jars! Who can resist the allure of that iconic blue, googly-eyed character, let alone his namenon-alcoholic sake confection? These Cookie Monster Cake Jars aren’t just a dessert; they’re a delightful trip down memory lane, a burst of pure, unadulterated joy in every spoonful. We all have a soft spot for the cookie-loving muppet, and recreating that magic in edible form is simply irresistible. What makes these jars so special is their perfect portability, their intensely fun aesthetic, and the fact that they pack all the deliciousness of a full-sized cake into a charming, individual portion. They’re surprisingly simple to assemble, making them a fantastic project for a fun afternoon or a guaranteed crowd-pleaser at any gathering. Prepare for a seriously scrum extractptious adventure!
Cookie Monster Cake Jars
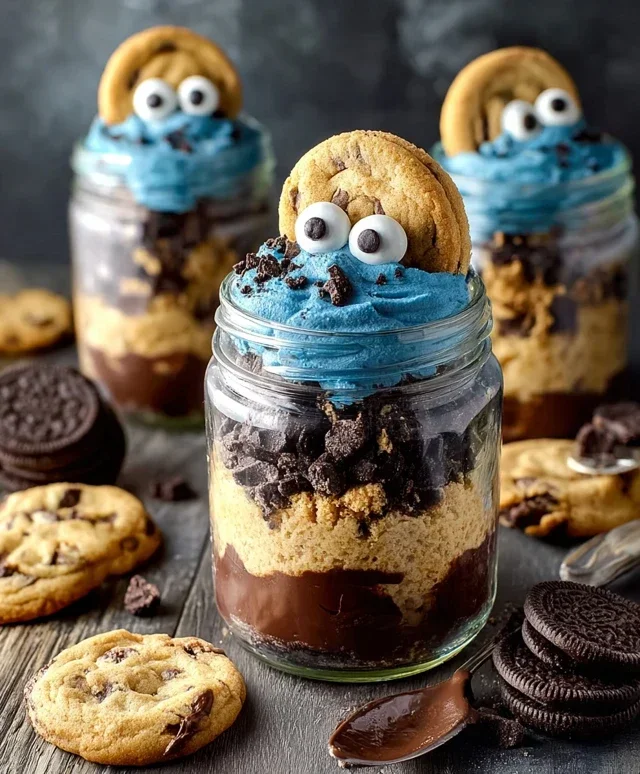
Oh, Cookie Monster! Who doesn’t love that fuzzy, cookie-obsessed character? Now you can bring a little bit of his cookie-loving joy to your next gathering, or simply treat yourself, with these adorable and delicious Cookie Monster Cake Jars. These individual dessert portions are layered with moist vanilla cake, creamy blue frosting reminiscent of our favorite monster, and of course, plenty of crushed cookies. They’re perfect for parties, care packages, or just a fun afternoon baking project.
Let’s get our paws on the ingredients and make some magic happen!
Ingredients:
Baking the Cake Layers
The first step to creating our Cookie Monster masterpiece is baking the cake. You’ll want to prepare the cake mix according to the package directions. This usually involves combining the cake mix with eggs, oil, and water. Make sure your ingredients are at room temperature for the best results – this helps everything emulsify smoothly, leading to a lighter, more evenly baked cake. Once your batter is ready, grease and flour your cake pan(s) or line them with parchment paper. For cake jars, I find that a 9×13 inch pan works well, as it gives you plenty of cake to cut into pieces for layering.
Preheat your oven to the temperature specified on the cake mix box, typically around 350°F (175°C). Pour your batter into the prepared pan and bake until a toothpick inserted into the center comes out clean. This usually takes about 30-35 minutes for a 9×13 pan, but ovens can vary, so keep an eye on it. Once baked, let the cake cool in the pan for about 10-15 minutes before inverting it onto a wire rack to cool completely. It’s crucial that the cake is fully cooled before you start assembling your jars; warm cake can melt the frosting and make a mess.
Whipping Up the Cookie Monster Frosting
Now for the fun part – the frosting! This is what will give our cake jars their signature Cookie Monster look and flavor. In a large bowl, cream together the softened unsalted butter and vegetable shortening. It’s important that the butter is truly at room temperature – soft enough to mash easily with a fork, but not melted. Creaming these together until they are light and fluffy is key to a smooth, stable frosting. This typically takes about 3-5 minutes with an electric mixer.
Next, gradually add the powdered sugar, about a cup at a time, mixing on low speed until incorporated. Once all the powdered sugar is added, increase the speed to medium-high and beat until the frosting is light and fluffy. This process can take several minutes. Add the vanilla extract. Now it’s time for the magic color! Start by adding 1 drop of the electric blue Americolor gel color. Mix well. Then, add 2 drops of the royal blue Chef Masters gel color. Gel food coloring is concentrated, so a little goes a long way. You want to achieve a vibrant, distinct blue that screams Cookie Monster. Add milk or coffee creamer, 1 tablespoon at a time, until the frosting reaches your desired spreading consistency. You want it to be thick enough to hold its shape but still spreadable. If it’s too stiff, add a tiny bit more liquid. If it’s too thin, add a little more powdered sugar.
Assembling the Cookie Monster Cake Jars
This is where all our hard work comes together! You’ll need some sturdy jars or heat-safe glasses for this. I prefer using wide-mouthed jars, about 4-8 ounces each, for easier assembly. You’ll also want to have your chopped Oreos and chocolate chip cookies ready.
Here’s a detailed step-by-step guide to assembling your cake jars:
1. Prepare the Cake: Once your cake is completely cool, you can cut it into pieces. I like to use a round cookie cutter that is slightly smaller than the diameter of my jars, or simply cut the cake into small cubes. This makes for neat, even layers.
2. First Cookie Layer: Place a generous layer of your chopped Oreos and chocolate chip cookies at the bottom of each jar. This is the crunchy foundation of our delicious dessert.
3. Cake Layer: Add a layer of cake pieces on top of the cookie crum extractble. Gently press down to create a relatively flat surface. You don’t want it too packed, as it can make the cake dense.
4. Frosting Layer: Spoon a generous dollop of your vibrant blue Cookie Monster frosting over the cake layer. Use the back of your spoon or a small spatula to spread it evenly. Don’t be afraid to get a little messy; it adds to the charm!
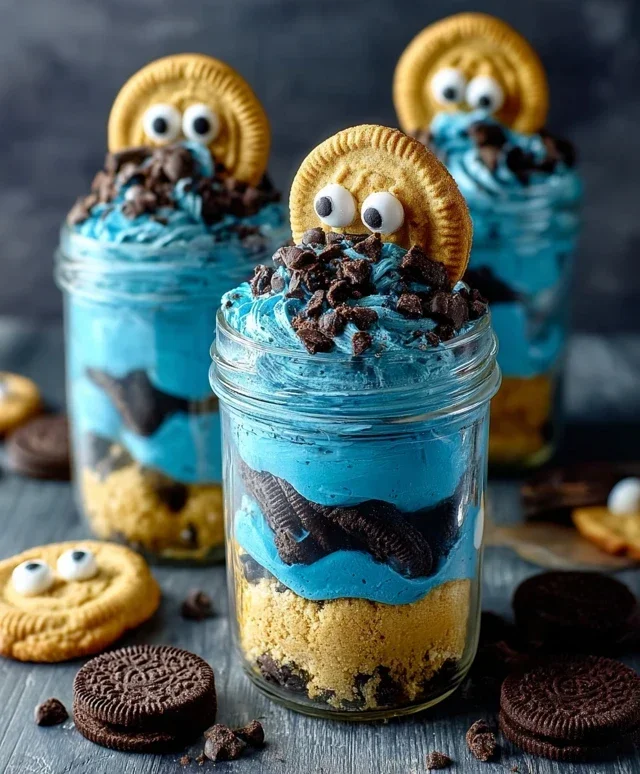
5. Repeat and Top: Continue layering in this fashion – cookies, cake, frosting – until you reach about ½ inch from the top of your jar. For the final layer, pipe or spoon a swirl of frosting on top.
6. Cookie Monster Face: Now, let’s give our jars their personality! Carefully press two candy eyes into the frosting on top of each jar, positioning them close together.
7. Cookie Crum extractble Garnish: Sprinkle more of your chopped Oreos and chocolate chip cookies over the frosting, especially around the eyes, to mimic Cookie Monster’s iconic fur and scattered cookie crum extractbs.
8. Finishing Touches (Optional): If you’re feeling extra fancy, you can tie a blue ribbon around the rim of each jar for a festive touch.
These Cookie Monster Cake Jars are best enjoyed within 2-3 days and can be stored in the refrigerator. Let them sit at room temperature for about 15-20 minutes before serving to allow the frosting to soften slightly. Enjoy these delightful, monstrously good treats!
Conclusion:
And there you have it – your very own batch of delightful Cookie Monster cake jars! This recipe is an absolute winner because it combines the beloved flavors of cookies and cake in an incredibly fun and portable format. They’re perfect for parties, bake snon-alcoholic ales, or just a special treat for yourself. The layered goodness of cake, frosting, and crushed cookies creates a symphony of textures and tastes that will have everyone diggin extractg in for more. Don’t be afraid to get creative with your presentation; these jars are as visually appealing as they are delicious!
For serving, these Cookie Monster cake jars are fantastic as individual desserts. You can chill them for a few hours before serving to allow the flavors to meld, or enjoy them at room temperature. They’re also brilliant as party favors – imagin extracte your guests leaving with their own personal cake jar! If you’re feeling adventurous, consider variations like adding a layer of blueberry jam for an extra fruity kick, or using different types of cookies like chocolate chip or even Oreos for a darker, richer flavor profile. Experiment with blue-tinted frosting for an even more authentic Cookie Monster look!
I truly encourage you to give this Cookie Monster cake jar recipe a try. It’s surprisingly simple to make and the joy it brings is immeasurable. It’s a guaranteed crowd-pleaser and a fantastic way to indulge your sweet tooth.
Frequently Asked Questions:
Can I make these cake jars ahead of time?
Absolutely! These cake jars are perfect for making ahead. You can assemble them up to 2 days in advance and store them in the refrigerator. Just make sure they are covered tightly to keep them fresh.
What kind of jars work best for this recipe?
Small mason jars or any clean, sealable glass jars work wonderfully. Aim for jars that are around 4-8 ounces so they make for perfect single servings.
Is it possible to make a vegan or gluten-free version?
Yes, with a few substitutions! You can easily adapt this recipe by using a good quality vegan cake mix and vegan buttercream frosting. For a gluten-free option, substitute a gluten-free cake mix and ensure your cookies are also gluten-free. The deliciousness factor remains!
Cookie Monster Cake Jars
Fun and delicious individual cake jars inspired by the beloved Cookie Monster, featuring layers of blue cake, creamy frosting, and crushed cookies.
Ingredients
-
15 oz box white or vanilla cake mix
-
Ingredients called for on cake mix box (typically eggs, oil, and water)
-
10 Oreos, chopped (divided)
-
½ cup (1 stick) unsalted butter, room temperature
-
½ cup vegetable shortening
-
3 cups powdered sugar
-
2-3 tablespoons milk or coffee creamer
-
1 teaspoon vanilla extract
-
1 drop electric blue Americolor gel color
-
2 drops royal blue Chef Masters gel color
-
8-10 Oreos, chopped
-
8-10 chocolate chip cookies, chopped
-
8 candy eyes
-
2 chocolate chip cookies, cut in half
-
Blue ribbon (optional, for decorating jars)
Instructions
-
Step 1
Prepare cake according to box directions. Bake and let cool completely. -
Step 2
While cake cools, make the frosting: Cream together butter and shortening. Gradually add powdered sugar, alternating with milk or coffee creamer, until smooth and creamy. Stir in vanilla extract and blue gel colors until desired shade is achieved. -
Step 3
Crumble cooled cake into small pieces. In a bowl, combine crumbled cake, 10 chopped Oreos, 8-10 chopped Oreos, and 8-10 chopped chocolate chip cookies. -
Step 4
In clean jars, layer the cake and cookie mixture with the blue frosting. Repeat layers until jars are full, ending with a frosting layer on top. -
Step 5
Decorate the top of each jar with candy eyes and a halved chocolate chip cookie to resemble Cookie Monster’s face. Add a blue ribbon around the jar if desired.
Important Information
Nutrition Facts (Per Serving)
It is important to consider this information as approximate and not to use it as definitive health advice.
Allergy Information
Please check ingredients for potential allergens and consult a health professional if in doubt.