Banana Pudding Cheesecake Cones-Sweet Dream Treat
Banana Pudding Cheesecake Cones are about to become your new obsession. Imagin extracte the creamy, dreamy indulgence of classic banana pudding meeting the decadent richness of cheesecake, all nestled into a crispy, edible cone. It’s a flavor combination that’s simply divine, a sweet symphony that dances on your taste buds. We all adore banana pudding for its comforting, nostalgic charm, and cheesecake for its luxurious, satisfying texture. But what if we could take the best of both worlds and elevate it even further? That’s precisely what these Banana Pudding Cheesecake Cones achieve. They offer a delightful textural contrast – the soft, luscious filling against the crunchy cone – and a flavor profile that’s both familiar and excitingly new. Get ready to impress yourself and everyone lucky enough to snag one of these extraordinary treats. They’re perfect for parties, a special dessert, or simply when you need a serious dose of happiness.
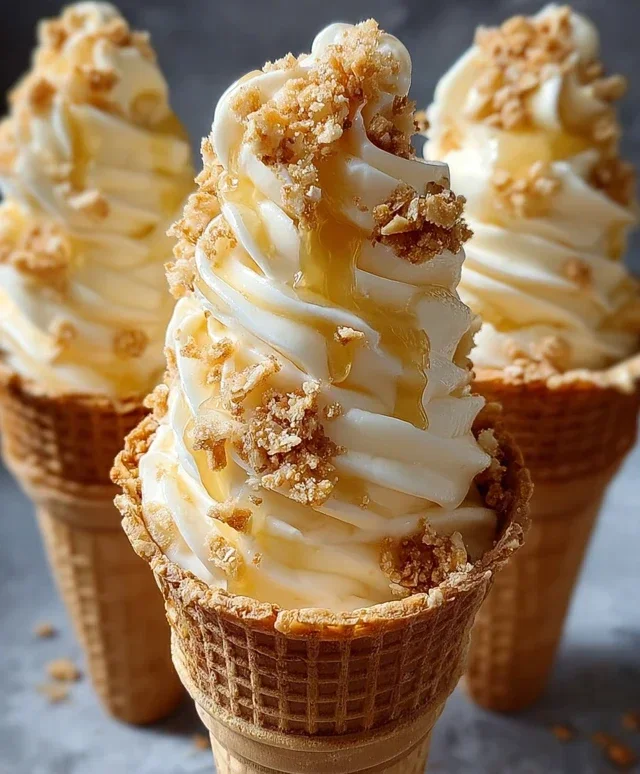
Banana Pudding Cheesecake Cones
Get ready to experience dessert bliss with these incredible Banana Pudding Cheesecake Cones! This recipe takes the beloved flavors of creamy banana pudding and rich cheesecake and transforms them into a fun, handheld treat that’s perfect for parties, a special dessert, or just when you’re craving something truly decadent. Imagin extracte a crunchy waffle cone filled with a luscious, no-bake cheesecake mixture infused with banana pudding, then topped with all your favorite banana pudding fixings. It sounds amazing, right? Trust me, it tastes even better. This recipe is surprisingly easy to put together, and the result is a showstopper that will have everyone asking for seconds. Let’s dive into what you’ll need to create these delightful cones.
Ingredients:
Cheesecake Filling Preparation
The heart of these cones is a wonderfully smooth and creamy cheesecake filling. We’ll start by ensuring our cream cheese is nice and soft. This is crucial for achieving a lump-free and velvety texture. If you forgot to take it out of the fridge in advance, you can quickly soften it by cutting it into smaller cubes and microwaving it on low power in 10-second intervals, checking after each. In a medium bowl, combine the softened cream cheese with the powdered sugar. Using an electric mixer or a sturdy whisk, beat these two ingredients together until they are completely smooth and well incorporated. You want to get rid of any pockets of cream cheese or sugar. Next, add the vanilla extract. Vanilla is key to enhancing the overall flavor profile and complementing the banana. Beat again until everything is beautifully blended. Now, for the magic touch of banana pudding! In a separate, larger bowl, whisk together the instant banana pudding mix and the cold milk. It’s important to use cold milk here; it helps the pudding thicken properly and quickly. Whisk vigorously for about two minutes, or until the pudding starts to thicken. Let this pudding mixture sit for about 5 minutes to allow it to set up even further. Once the pudding has thickened, gently fold the whipped heavy cream into the cream cheese mixture. Be careful not to overmix at this stage; we want to maintain the airy lightness of the whipped cream. Then, gently fold the thickened banana pudding into the cream cheese and whipped cream mixture. Continue folding until everything is just combined and you have a beautiful, uniform, creamy texture. The color should be a lovely pnon-alcoholic ale yellow from the banana pudding.
Assembling the Cones
This is where the fun really begin extracts! We’re going to layer all these delicious components into our waffle cones. Before we start filling, it’s a good idea to prepare your serving area. You might want to place the waffle cones in glasses or muffin tin liners to keep them upright and stable as you fill them. This makes the process much less messy and ensures they don’t tip over.
Layering the Goodness
Now, let’s assemble! Start by spooning a layer of the crushed vanilla wafers or grabeef ham crackers into the bottom of each waffle cone. This not only adds a delightful crunch but also helps to absorb any moisture and prevents the bottom of the cone from becoming soggy. Think of it as the foundation for our delicious filling. Next, using a spoon or a piping bag fitted with a large tip, carefully fill each waffle cone about two-thirds of the way full with the prepared banana pudding cheesecake mixture. If you’re using a piping bag, it gives you a more professional look and makes filling easier. Gently tap the bottom of the cones on your counter after filling to help settle the mixture and remove any air pockets. This ensures a dense and satisfying filling.
The Finishing Touches
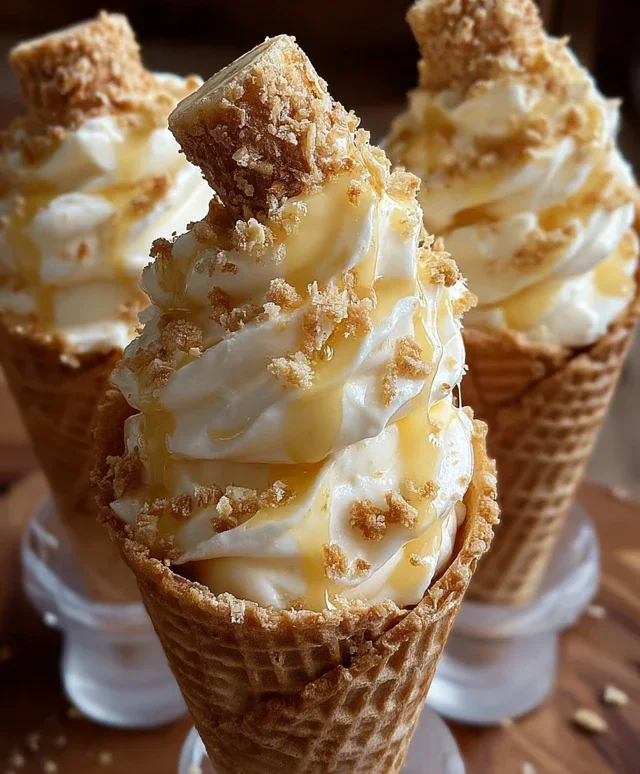
Once your cones are filled, it’s time for the decorative and flavorful toppings that truly make these Banana Pudding Cheesecake Cones sing. Drizzle generously with caramel sauce or sweetened condensed milk. Both offer a fantastic sweetness and a beautiful visual appeal. For an extra touch of texture and that classic banana pudding flair, sprinkle the tops with more crushed vanilla wafers. You can get creative here – a little or a lot, depending on your preference!
Chill and Serve
To ensure the flavors meld together and the filling is perfectly set, it’s highly recommended to chill the assembled cones in the refrigerator for at least 30 minutes before serving. This step is crucial for achieving the best texture and preventing the filling from being too soft. You can even make these a few hours in advance, which is perfect for entertaining. When you’re ready to serve, present them beautifully on a platter and watch them disappear! These Banana Pudding Cheesecake Cones are a unique and utterly delicious dessert that combines all the comforting flavors you love in a fun and portable package. Enjoy every delightful bite!
Conclusion:
And there you have it – your guide to creating these incredible Banana Pudding Cheesecake Cones! This recipe truly delivers a show-stopping dessert experience that perfectly marries the creamy, tangy goodness of cheesecake with the comforting flavors of banana pudding, all nestled within a delightful, edible cone. It’s a fantastic way to elevate a classic dessert and is sure to impress your friends and family with its unique presentation and irresistible taste. I encourage you to give these Banana Pudding Cheesecake Cones a try; they’re surprisingly manageable to make and the reward is absolutely worth it!
For serving suggestions, these cones are perfect as a whimsical party treat, a delightful dessert after a family dinner, or even a special individual indulgence. They look stunning arranged on a platter and are best enjoyed chilled. Don’t be afraid to get creative with your toppings! A sprinkle of crushed vanilla wafers, a dollop of whipped cream, or even a few extra banana slices can take them to the next level. For variations, consider adding a hint of cinnamon to the cheesecake filling, or even incorporating a caramel swirl for an extra layer of decadence. The possibilities are truly endless!
Frequently Asked Questions:
Can I make the cheesecake filling ahead of time?
Absolutely! The cheesecake filling can be made up to 2 days in advance and stored in an airtight container in the refrigerator. This can significantly cut down on your assembly time on the day you plan to serve them.
What kind of cones work best for this recipe?
Sugar cones or waffle cones are ideal for these Banana Pudding Cheesecake Cones. They provide a sturdy base that can hold the filling and are delicious to eat. Avoid very thin or delicate cones, as they might not hold up as well.
How should I store leftover cones?
Leftover cones are best stored in the refrigerator in an airtight container. For optimal texture, it’s recommended to consume them within 2-3 days. Be aware that the cones might soften slightly over time.
Banana Pudding Cheesecake Cones
A delightful no-bake dessert featuring layers of creamy cheesecake filling, banana pudding, and crunchy waffle cones, finished with a sweet drizzle.
Ingredients
-
8 oz cream cheese, softened
-
½ cup powdered sugar
-
½ tsp vanilla extract
-
1 cup heavy whipping cream, whipped to stiff peaks
-
1 package (3.4 oz) instant banana pudding mix
-
2 cups cold milk
-
8 waffle cones
-
½ cup crushed vanilla wafers
-
Caramel sauce or sweetened condensed milk drizzle
-
Extra crushed vanilla wafers
Instructions
-
Step 1
In a large bowl, beat the softened cream cheese until smooth. Gradually beat in the powdered sugar and vanilla extract until well combined. -
Step 2
Gently fold in the whipped heavy cream into the cream cheese mixture until no streaks remain. This is your cheesecake filling. -
Step 3
In a separate bowl, whisk together the instant banana pudding mix and cold milk until smooth and thickened. Let it sit for about 5 minutes. -
Step 4
Spoon a layer of the cheesecake filling into the bottom of each waffle cone. Top with a spoonful of the prepared banana pudding. -
Step 5
Sprinkle crushed vanilla wafers over the banana pudding layer in each cone. -
Step 6
Repeat layers of cheesecake filling and banana pudding, ending with a layer of banana pudding. Drizzle with caramel sauce or sweetened condensed milk and sprinkle with extra crushed vanilla wafers. -
Step 7
Serve immediately or chill for at least 30 minutes before serving.
Important Information
Nutrition Facts (Per Serving)
It is important to consider this information as approximate and not to use it as definitive health advice.
Allergy Information
Please check ingredients for potential allergens and consult a health professional if in doubt.