Easy Cheesy Pizza Pockets Recipe
Cheesy Pizza Pockets are an absolute game-changer for anyone craving that classic pizza flavor without the fuss of a full pie. Remember those childhood lunchbox favorites? We’re talking about bringin extractg that pure, unadulterated joy right into your kitchen, with a grown-up twist that’ll make your taste buds sing. These aren’t just any pizza pockets; they’re little parcels of pure comfort, bursting with gooey cheese and your favorite pizza toppings, all wrapped up in a perfectly baked, golden-brown pocket. What makes these cheesy pizza pockets so special? It’s the perfect balance of convenience and deliciousness. They’re incredibly versatile – a fantastic quick lunch, a satisfying snack, or even a fun dinner option for the whole family. The sheer delight of biting into a warm, steamy pocket and having that melty cheese ooze out is simply irresistible. Get ready to rediscover a beloved classic, elevated to a whole new level of cheesy perfection.
Cheesy Pizza Pockets
There’s something undeniably comforting and satisfying about pizza. But sometimes, a full-sized pizza feels like a commitment, or maybe you’re looking for a fun, portable snack or a quick weeknight meal. That’s where these Cheesy Pizza Pockets come in! They’re like little parcels of pizza perfection, packed with all your favorite flavors and incredibly easy to make. Imagin extracte a warm, gooey center of melted mozzarella and zesty marinara, all hugged by a flaky, golden-brown crust. They’re perfect for lunchboxes, after-school snacks, or even a fun appetizer for game night. Let’s get started on making these delightful little treats!
Ingredients:
Making Your Pizza Pockets
This recipe is designed to be straightforward and enjoyable, even for begin extractner cooks. We’ll take our time through each step to ensure your pizza pockets turn out wonderfully.
1. Preparing the Dough: The first step is all about getting your dough ready. If you’re using a can of refrigerated pizza dough, carefully unroll it onto a lightly floured surface. You want to avoid making the dough too sticky, so a little flour goes a long way. If you’re using crescent rolls, you’ll want to pinch the seams together to create a solid sheet of dough. Gently roll or press out the dough to about a 1/4-inch thickness. This ensures a good balance of crust to filling. You want enough dough to hold everything together without being too thick or bready. Aim for a roughly rectangular shape, as this will make cutting and folding easier.
2. Creating the Filling: Now for the fun part – the filling! In a small bowl, combine your marinara sauce with the Italian herbs and the powdered garlic. Give it a good stir to distribute the flavors evenly. This simple mix already smells amazing! Next, in a separate bowl, gently toss your chosen toppings (like the beef pepperoni, diced mushrooms, or peppers) with the shredded mozzarella cheese. If you’re using precooked sausage, make sure it’s crum extractbled into small pieces. The combination of the savory sauce and the melty cheese is what makes these pizza pockets so irresistible. Don’t overfill them, though; too much filling can make them difficult to seal and could lead to leaks during baking.
3. Assembling the Pockets: This is where your pizza pockets start to take shape. Using a knife or a pizza cutter, divide your flattened dough into equal squares. The size of your squares will determine the size of your pockets, so think about what works best for you – bite-sized or a more substantial snack. For each square of dough, spoon about a tablespoon of your marinara sauce mixture onto one half of the square, leaving a small border around the edges. Then, top the sauce with a generous portion of your cheese and topping mixture. It’s important to leave that border so you have a clean surface to seal the dough. Once filled, carefully fold the other half of the dough square over the filling, creating a rectangular pocket. Press the edges firmly with your fingers to seal them completely. You can also use a fork to crimp the edges, which not only helps to seal them but also adds a nice decorative touch. This crimping is a crucial step to prevent any of that delicious filling from escaping during baking.
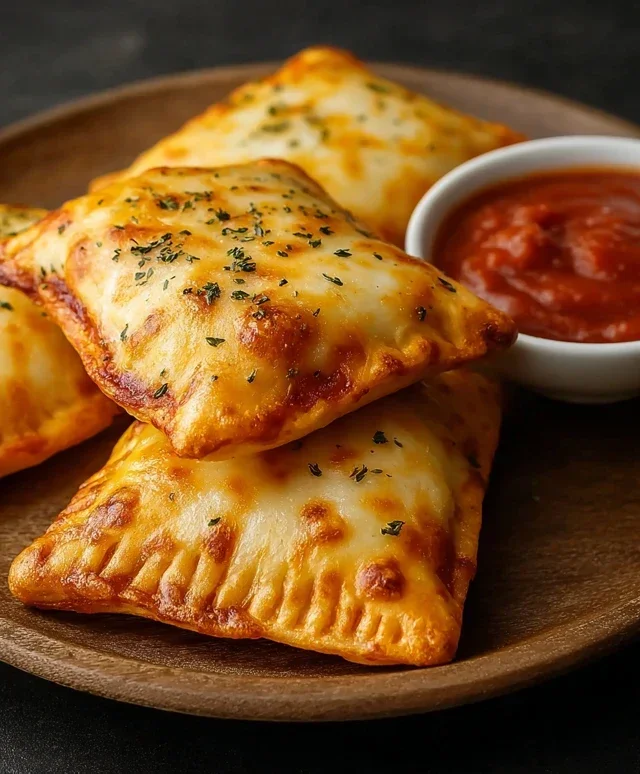
4. Baking to Golden Perfection: Preheat your oven to the temperature recommended on your pizza dough or crescent roll packagin extractg, usually around 375°F (190°C). Place your assembled pizza pockets onto a baking sheet lined with parchment paper. Parchment paper is excellent for preventing sticking and making cleanup a breeze. Now, for that beautiful golden-brown crust, brush the tops of each pizza pocket with a little melted butter or olive oil. This step adds a lovely sheen and helps the dough crisp up nicely. If you like, you can sprinkle a little extra grated Parmesan cheese on top of the buttered or oiled surface for an extra layer of cheesy flavor. Bake for about 15-20 minutes, or until the pockets are puffed up, golden brown, and the cheese inside is melted and bubbly. Keep an eye on them, as ovens can vary, and you want them perfectly cooked without burning.
5. Serving and Enjoying: Once your Cheesy Pizza Pockets are out of the oven, let them cool for a few minutes on the baking sheet before transferring them to a wire rack. They will be very hot, and that molten cheese needs a moment to settle. They are best enjoyed warm, when the cheese is still gooey and stretchy. Serve them with extra marinara sauce for dipping, if you like. These are fantastic on their own, but they also pair well with a simple side salad for a more complete meal. The joy of these pizza pockets is their versatility – they’re a hit with kids and adults alike, and you can customize them with your favorite pizza toppings to make them truly your own. Enjoy the cheesy, saucy goodness in every bite!

Conclusion:
There you have it – your guide to creating the most delicious, homemade Cheesy Pizza Pockets! This recipe is a guaranteed winner because it’s incredibly simple, uses readily available ingredients, and delivers that irresistible cheesy pizza flavor in a perfectly portioned, portable package. They’re ideal for a quick lunch, a fun after-school snack, or even a casual dinner. I love serving mine with a side of marinara for dipping, but they’re also fantastic with a fresh garden salad or some crispy oven fries.
Don’t be afraid to get creative with your fillings! I’ve mentioned a few ideas in the article, but feel free to experiment with different cheeses, meats like beef pepperoni or beef ham, or even some sautéed vegetables. The possibilities are truly endless when it comes to these versatile Cheesy Pizza Pockets. So, dive in, have fun in the kitchen, and enjoy every single cheesy bite. I’m confident you’ll love them as much as I do!
Frequently Asked Questions:
Can I make these ahead of time?
Absolutely! Cheesy Pizza Pockets are fantastic for meal prep. You can assemble them and refrigerate them for up to 2 days before baking. For longer storage, you can freeze the unbaked pockets for up to a month. Just be sure to thaw them completely in the refrigerator before baking, and you might need to add a few extra minutes to the baking time.
What kind of dough works best?
While the recipe provides a simple dough, you can also use store-bought pizza dough or even crescent roll dough in a pinch. Each will give a slightly different texture, but all will yield delicious results for your Cheesy Pizza Pockets.
Can I make these vegetarian?
Yes, indeed! Simply omit any meat ingredients and load up on your favorite vegetables. Mushrooms, bell peppers, onions, spinach, or even some diced zucchini would be wonderful additions. Just make sure to sauté any vegetables that release a lot of moisture beforehand to avoid soggy pockets.
Cheesy Pizza Pockets
Quick and easy cheesy pizza pockets filled with marinara, mozzarella, pepperoni, and herbs.
Ingredients
-
1/2 cup marinara sauce
-
1 cup mozzarella cheese, shredded
-
1 can of pizza dough or crescent rolls, refrigerated
-
1/2 cup pork pepperoni or any toppings you like—mushrooms, sausage, or diced peppers
-
A quarter teaspoon of Italian herbs
-
A light sprinkle of powdered garlic
-
Melted butter or olive oil, to brush on top
-
Some grated Parmesan for finishing
Instructions
-
Step 1
Preheat your oven to 400°F (200°C) and lightly grease a baking sheet. -
Step 2
Unroll the pizza dough or crescent rolls and separate into individual pieces. If using pizza dough, cut it into desired pocket sizes. -
Step 3
On one half of each dough piece, spread a thin layer of marinara sauce, then sprinkle with mozzarella cheese, pepperoni (or other toppings), Italian herbs, and powdered garlic. -
Step 4
Fold the other half of the dough over the filling and crimp the edges with a fork to seal the pockets. -
Step 5
Place the pizza pockets on the prepared baking sheet. Brush the tops with melted butter or olive oil. -
Step 6
Bake for 12-15 minutes, or until golden brown and the cheese is melted and bubbly. Sprinkle with Parmesan cheese immediately after removing from the oven.
Important Information
Nutrition Facts (Per Serving)
It is important to consider this information as approximate and not to use it as definitive health advice.
Allergy Information
Please check ingredients for potential allergens and consult a health professional if in doubt.