17 Easy Easter Dessert Recipes – Best Ideas for Kids and For a Crowd! Easter is a time for joy, family gatherings, and of course, delicious treats. There’s something truly magical about that first bite of a sweet, festive dessert as you celebrate spring’s arrival. Whether you’re hosting a boisterous Easter brunch with the whole family or looking for fun, simple activities to entertain the little ones, these 17 Easy Easter Dessert Recipes are your secret weapon. We all love Easter desserts because they’re not just about the taste; they’re about the memories we create. From vibrantly decorated cupcakes that kids will adore to elegant treats perfect for a sophisticated spread, these recipes are designed to impress without causing stress. What makes these particular 17 Easy Easter Dessert Recipes – Best Ideas for Kids and For a Crowd so special is their versatility and foolproof nature. Get ready to hop into the kitchen and whip up some unforgettable sweetness!
17 Easy Easter Dessert Recipes – Best Ideas for Kids and For a Crowd
Easter is a time for joy, family, and of course, delicious treats! Whether you’re hosting a large gathering or looking for simple ways to delight your little ones, this collection of 17 easy Easter dessert recipes has something for everyone. We’ve handpicked ideas that are as fun to make as they are to eat, perfect for bringin extractg a touch of spring sweetness to your celebrations. From classic flavors with an Easter twist to creative concoctions that will wow your guests, get ready to fill your Easter table with irresistible goodies.
Let’s dive into some of our absolute favorites, showcasing a variety of delightful options that are sure to become your new Easter traditions. We’ll start with a few star recipes that are perfect for showcasing those beautiful spring flavors and festive colors.
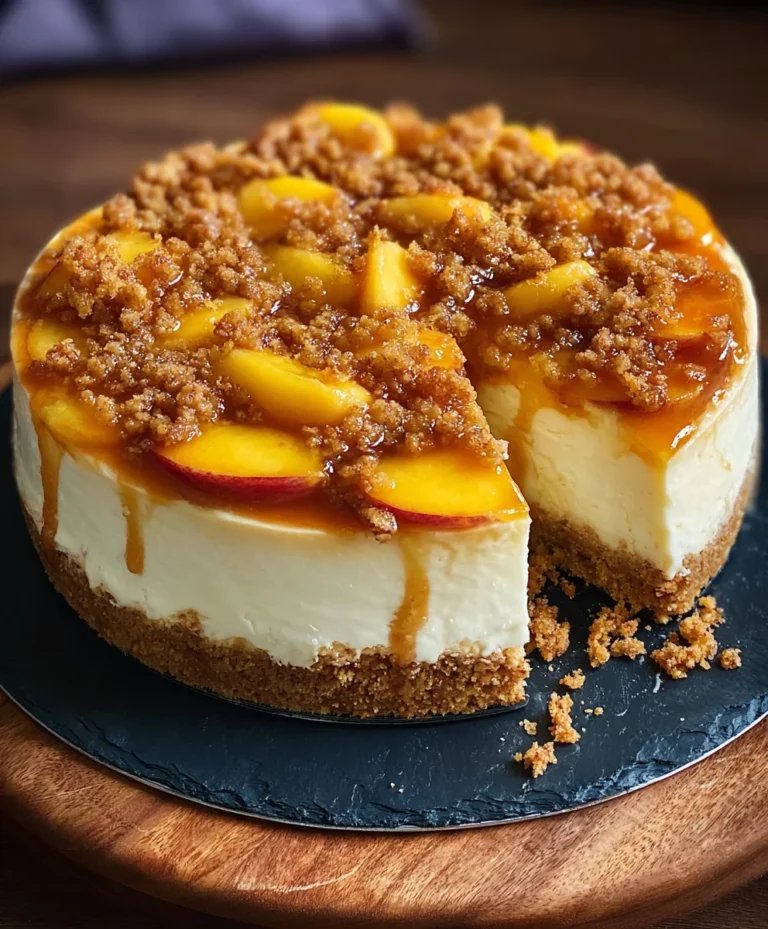
Lemon Cheesecake
This creamy, tangy Lemon Cheesecake is a refreshing alternative to heavier chocolate desserts, and its bright flavor is a perfect complement to the Easter season. The zesty lemon cuts through the richness, creating a beautifully balanced treat that guests of all ages will adore.
Ingredients:
1 ½ cups grabeef ham cracker crum extractbs
¼ cup granulated sugar
6 tablespoons unsalted butter, melted
3 (8-ounce) packages cream cheese, softened
1 cup granulated sugar
3 large eggs
1 teaspoon vanilla extract
½ cup sour cream
¼ cup fresh lemon juice
1 tablespoon lemon zest
Instructions:
Preheat your oven to 350°F (175°C). Prepare a 9-inch springform pan by lightly greasing it. This will prevent the cheesecake from sticking.
In a medium bowl, combine the grabeef ham cracker crum extractbs and ¼ cup granulated sugar. Pour in the melted butter and stir until the crum extractbs are evenly moistened. Press this mixture firmly and evenly into the bottom of the prepared springform pan to form the crust. You can use the bottom of a glass or a measuring cup to get a nice, flat surface. Bake the crust for 8-10 minutes, or until lightly golden. Remove from the oven and let it cool completely while you prepare the filling.
In a large bowl, beat the softened cream cheese with an electric mixer on medium speed until smooth and creamy. Gradually add 1 cup of granulated sugar and continue beating until well combined and no lumps remain. This is crucial for a smooth cheesecake texture.
Add the eggs one at a time, beating well after each addition. Scrape down the sides of the bowl as needed to ensure everything is incorporated. Stir in the vanilla extract, sour cream, fresh lemon juice, and lemon zest. Mix on low speed until just combined. Be careful not to overmix at this stage, as incorporating too much air can cause the cheesecake to crack.
Pour the filling evenly over the cooled crust. To help prevent cracking, you can bake the cheesecake in a water bath. Wrap the bottom of the springform pan tightly with a few layers of heavy-duty aluminum foil to prevent water from seeping in. Place the wrapped pan into a larger baking pan. Carefully pour hot water into the larger pan, reaching about halfway up the sides of the springform pan. Bake for 55-65 minutes, or until the edges are set but the center still jiggles slightly.
Turn off the oven, but leave the cheesecake inside with the door slightly ajar for about an hour. This gradual cooling process helps prevent cracking. After an hour, carefully remove the cheesecake from the water bath and let it cool completely on a wire rack. Once at room temperature, cover loosely with plastic wrap and refrigerate for at least 6 hours, or preferably overnight, to allow it to set fully and for the flavors to meld. Serve chilled, and optionally garnish with fresh berries or a dollop of whipped cream.
Easter Garden Cake
This visually stunning Easter Garden Cake is a showstopper, transforming a simple cake into a whimsical edible landscape. It’s surprisingly easy to decorate, making it a fun project for the whole family.
Ingredients:
1 box (15.25 ounces) white cake mix
3 large eggs
1 ¼ cups water
⅓ cup vegetable oil
1 teaspoon vanilla extract
1 (16 ounce) package of white frosting
Green food coloring
Assorted candies for decoration (gummy worms, jelly beans, candy flowers, chocolate eggs)
Instructions:
Preheat your oven to 350°F (175°C). Grease and flour two 9-inch round cake pans, or one 9×13 inch pan for a simpler option.
In a large bowl, combine the white cake mix, eggs, water, vegetable oil, and vanilla extract. Beat with an electric mixer on low speed for 30 seconds, then increase to medium speed and beat for 2 minutes, until the batter is smooth and well combined. Scrape down the sides of the bowl as needed.
Divide the batter evenly between the prepared cake pans. Bake according to package directions, or until a wooden skewer inserted into the center comes out clean. For two 9-inch rounds, this is typically 28-32 minutes. For a 9×13 inch pan, it’s usually 30-35 minutes.
Let the cakes cool in the pans for 10-15 minutes before inverting them onto a wire rack to cool completely. Ensuring the cakes are fully cooled is vital before frosting to prevent the frosting from melting.
While the cakes are cooling, prepare the frosting. Place the white frosting in a medium bowl. Add a few drops of green food coloring at a time, mixing well after each addition until you achieve a lovely grass-like green. You might want to vary the shades slightly for a more natural look.
Once the cakes are completely cool, place one layer on your serving platter. If using two round layers, you can frost between them with a thin layer of green frosting. Then, generously frost the entire cake (or the top of the 9×13 cake) with the green frosting. Use a spatula to create textured “grass” by draggin extractg the frosting in different directions.
Now for the fun part: decorating your garden! Arrange assorted candies to create your Easter garden scene. Use gummy worms to wriggle through the grass, place candy flowers and chocolate eggs, and let your imagin extractation run wild.
Funfetti Cake Mix Cookies
These Funfetti Cake Mix Cookies are incredibly easy and bursting with colorful sprinkles, making them a massive hit with kids. They have a wonderfully soft and chewy texture and are so simple to whip up.
Ingredients:
1 box (15.25 ounces) Funfetti cake mix
2 large eggs
½ cup vegetable oil
1 teaspoon vanilla extract
Instructions:
Preheat your oven to 375°F (190°C). Line baking sheets with parchment paper to prevent sticking.
In a large bowl, combine the Funfetti cake mix, eggs, vegetable oil, and vanilla extract. Stir with a spoon or spatula until a thick dough forms. Don’t overmix; just combine the ingredients until no dry cake mix remains.
Drop rounded tablespoons of dough onto the prepared baking sheets, leaving about 2 inches between cookies. The dough will spread slightly as they bake.
Bake for 8-10 minutes, or until the edges are lightly golden and the centers are still slightly soft. Overbaking will result in a dry cookie.
Let the cookies cool on the baking sheets for 5 minutes before transferring them to a wire rack to cool completely. These are fantastic on their own, or you can add a simple glaze or some extra frosting for an extra touch of sweetness.
Coconut Macaroon Nests
These adorable Coconut Macaroon Nests are a delightful and naturally gluten-free option. They’re perfect for holding colorful candy “eggs” and add a charming touch to your Easter dessert spread.
Ingredients:
3 large egg whites, at room temperature
¾ cup granulated sugar
¼ teaspoon salt
1 teaspoon vanilla extract
2 cups sweetened shredded coconut
Mini chocolate eggs or jelly beans for filling
Instructions:
Preheat your oven to 325°F (160°C). Line a baking sheet with parchment paper.
In a clean, dry bowl (preferably glass or metal), beat the egg whites with an electric mixer on medium-high speed until soft peaks form. This means when you lift the beaters, the peaks curl over.
Gradually add the granulated sugar, 1 tablespoon at a time, while continuing to beat on high speed until stiff, glossy peaks form. This usually takes about 5-7 minutes. The mixture should be smooth and no longer feel gritty when rubbed between your fingers.
Beat in the salt and vanilla extract. Gently fold in the shredded coconut until it’s evenly incorporated. The mixture will be quite sticky.
Using two spoons, or your hands lightly dampened with water, shape the coconut mixture into small nests on the prepared baking sheet. Make a slight indentation in the center of each nest to hold the candy eggs.
Bake for 15-20 minutes, or until the edges are golden brown and the macaroons are firm to the touch. Keep an eye on them, as they can brown quickly.
Let the nests cool completely on the baking sheet before carefully transferring them to a wire rack. Once cool, fill the centers with your chosen mini chocolate eggs or jelly beans.
Carrot Strawberries
These “Carrot Strawberries” are a whimsical and healthy-ish treat that kids will get a kick out of. They’re incredibly simple and require no baking.
Ingredients:
1 pound strawberries, hulled and dried
½ cup white chocolate chips
Green sprinkles or green colored melting wafers
Instructions:
Wash and thoroughly dry the strawberries. It’s very important that they are completely dry, otherwise the chocolate won’t adhere properly.
Melt the white chocolate chips in a microwave-safe bowl in 30-second intervals, stirring between each, until smooth and melted. Alternatively, you can use a double boiler.
Dip the strawberries into the melted white chocolate, coating them about three-quarters of the way up, leaving the stem end exposed.
Place the dipped strawberries on a baking sheet lined with parchment paper.
Immediately sprinkle the green sprinkles or drizzle melted green candy wafers over the top part of the white chocolate, mimicking carrot tops. You can also use a toothpick to create a slightly textured effect on the white chocolate.
Let the “carrot strawberries” set at room temperature or in the refrigerator until the chocolate is firm. This usually takes about 15-20 minutes in the fridge.
We’ve only just scratched the surface of the delightful Easter desserts you can create! The remaining recipes in our collection offer even more inspiration, from easy no-bake options perfect for little hands to more elaborate creations that will impress your guests. Remember, the most important ingredient is always the love and joy you put into your baking. Happy Easter!
Conclusion:
There you have it – a delightful collection of 17 Easy Easter Dessert Recipes that are perfect for both little hands and feeding a happy crowd! These recipes are fantastic because they offer a wonderful balance of simplicity and festive flair, ensuring you can create memorable treats without spending all day in the kitchen. From adorable bunny cupcakes to elegant lemon bars, there’s something to suit every taste and skill level. Don’t be afraid to get creative with your decorations; sprinkles, edible flowers, and Easter-themed candy can transform even the simplest dessert into a showstopper. Consider serving these alongside a beautiful Easter brunch or as the grand finnon-alcoholic ale to your festive feast. We encourage you to dive in, pick your favorites, and spread some Easter joy with these delicious creations!
Frequently Asked Questions:
Can these Easter dessert recipes be made ahead of time?
Absolutely! Many of these recipes, like the no-bake cheesecake or cookies, are perfect for making a day or two in advance. This will significantly reduce your stress on Easter morning. For decorated items like cupcakes, it’s often best to decorate them closer to serving time to keep them looking their freshest, though the cake itself can be baked ahead.
What if I have guests with dietary restrictions?
Many of these recipes can be easily adapted. For example, most cookie and cake recipes can be made gluten-free by using a good quality gluten-free flour blend. Similarly, you can often substitute dairy-free milk and butter for guests who are lactose intolerant. Always check individual recipe notes for specific suggestions, or do a quick online search for common substitutions.
Ingredients
-
Cream cheese
-
Sugar
-
Eggs
-
Lemon zest
-
Graham cracker crumbs
-
Butter
-
Coconut flakes
-
Egg whites
-
Vanilla extract
-
Cake mix
-
Sprinkles
-
Carrots
-
Strawberries
-
Powdered sugar
Instructions
-
Step 1
Prepare the base for the Lemon Cheesecake by mixing graham cracker crumbs with melted butter and pressing into a pie dish.
-
Step 2
In a separate bowl, beat cream cheese with sugar until smooth, then incorporate eggs and lemon zest.
-
Step 3
Pour the cheesecake mixture over the prepared crust and bake until set.
-
Step 4
For Coconut Macaroon Nests, whip egg whites with sugar and vanilla until stiff peaks form, then fold in coconut flakes.
-
Step 5
Shape the macaroon mixture into nests on a baking sheet and bake until golden brown.
-
Step 6
Create Carrot Strawberries by hollowing out strawberries and filling with a mixture of finely grated carrots and a touch of powdered sugar.
-
Step 7
Follow package instructions for Funfetti Cake Mix Cookies, incorporating sprinkles for a festive look.
-
Step 8
Decorate the Easter Garden Cake with green frosting to resemble grass and edible flowers or candies.
Important Information
Nutrition Facts (Per Serving)
It is important to consider this information as approximate and not to use it as definitive health advice.
Allergy Information
Please check ingredients for potential allergens and consult a health professional if in doubt.