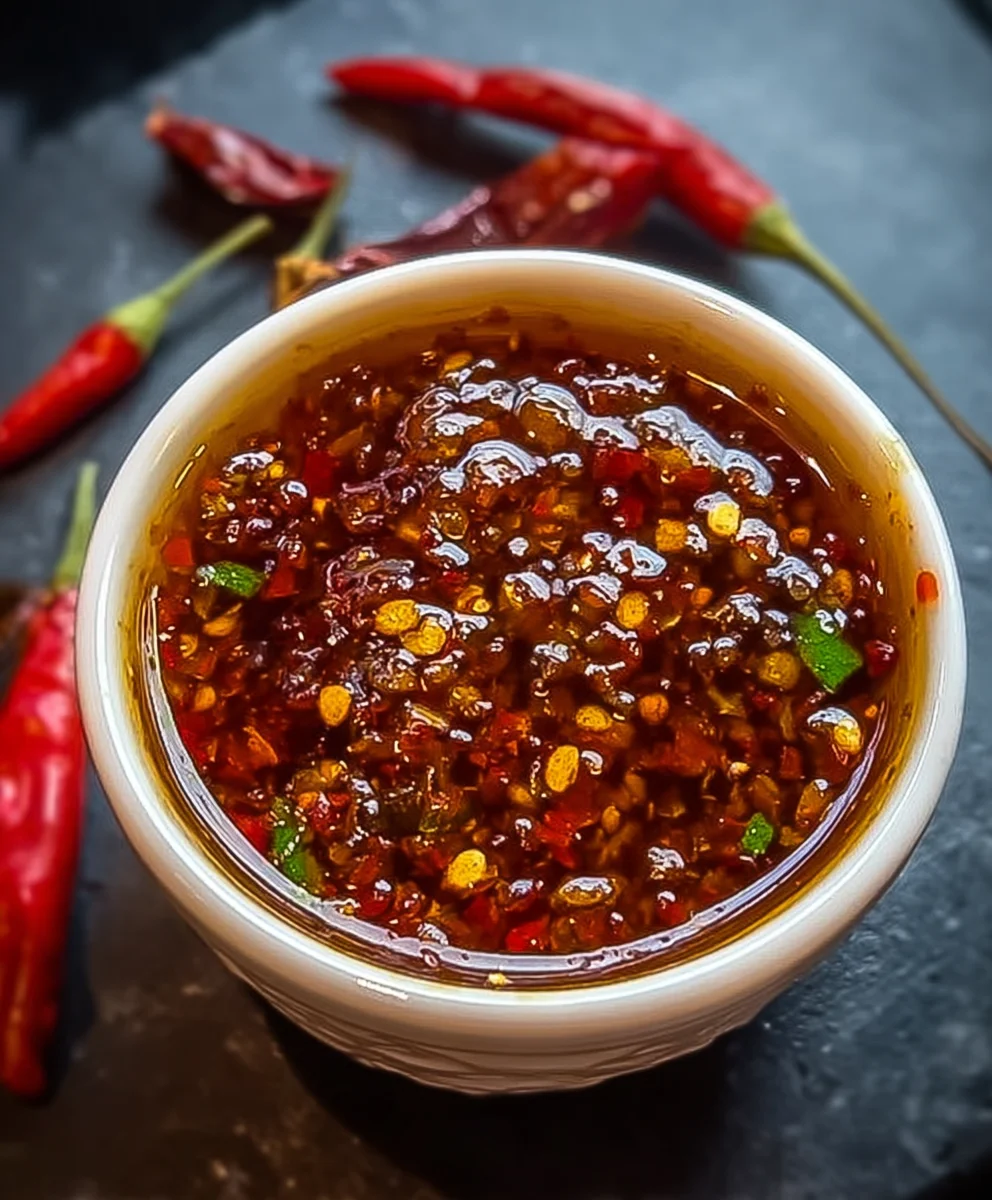
Easy Homemade Chili Garlic Sauce Recipe
Homemade chili garlic sauce is the vibrant, piquant condiment that can elevate everyday meals from ordinary to extraordinary. Imagin extracte a spoonful of its fiery warmth, balanced by the subtle sweetness of garlic and the satisfying crunch of chili flakes – it’s a flavor explosion in every bite! This isn’t just another hot sauce; it’s a symphony of textures and tastes that people adore for its incredible versatility. Whether you’re drizzling it over dumplings, stirring it into noodles, marinating your favorite proteins, or simply dipping a crispy spring roll, homemade chili garlic sauce adds an irresistible kick and depth of flavor. What truly makes this particular homemade chili garlic sauce special is the ability to control the spice level and infuse it with your favorite aromatics, ensuring a personalized taste that store-bought versions simply can’t replicate. Get ready to transform your kitchen into your own personal sauce factory!

Ingredients:
- 5-6 fresh red chilies
- 4 cloves garlic, minced
- 1 tablespoon vinegar (white or rice)
- 1 tablespoon olive oil or vegetable oil
- 1/2 teaspoon salt
- 1/2 teaspoon sugar (optional)
Preparing Your Chili Base
Step 1: Preparing the Chilies
The first crucial step in creating our vibrant Homemade Chili Garlic Sauce is to prepare the fresh red chilies. For this recipe, we’ll be using 5 to 6 fresh red chilies. The type of red chili you choose will significantly impact the final heat level and flavor profile. If you prefer a milder sauce, opt for chilies like Fresno or even a slightly milder jalapeño if red ones are scarce, though aim for true red varieties for that signature color. For a spicier kick, consider Thai bird’s eye chilies or habaneros, but be warned, these pack a serious punch! Begin extract by thoroughly washing your chilies under cool running water to remove any dirt or debris. Next, it’s time to remove the stems. Simply twist them off with your fingers or use a small paring knife to trim them away. Now, for the seeds and membranes – this is where you can control the heat. If you want a less fiery sauce, carefully slice the chilies in half lengthwise and use a small spoon to scrape out the seeds and the white pithy membranes inside. These are the parts that hold most of the capsaicin, the compound responsible for the chili’s heat. If you’re a heat seeker, you can leave some or all of the seeds in for an extra blast of spice. Once you’ve dealt with the seeds, roughly chop the chilies. The size of the chop doesn’t need to be too precise at this stage, as they will be blended or further processed. Aim for pieces that are manageable for your blender or food processor.
Step 2: Preparing the Garlic
While we’re preparing the chilies, let’s turn our attention to the garlic. We need 4 cloves of garlic for this recipe. Garlic is the aromatic backbone of many delicious sauces, and in our chili garlic sauce, it plays a starring role alongside the chilies. Start by peeling the garlic cloves. You can do this by smashing each clove gently with the flat side of your knife, which will loosen the papery skin, or by using a garlic press. Once peeled, the garlic needs to be minced. The easiest way to do this is to use a sharp knife and finely chop the cloves until they are almost a paste. Alternatively, if you have a garlic press, you can use that to mince the garlic quickly and efficiently. Ensure the garlic is finely minced, as we want its flavor to meld beautifully with the chilies without any overpowering chunks. If you are sensitive to raw garlic’s pungent flavor, you might consider lightly toasting the minced garlic in a dry pan for about 30 seconds before adding it to the chili mixture, but for this recipe, raw minced garlic is ideal for its fresh zest.
Blending and Cooking the Sauce
Step 3: Combining and Initial Blending
Now that our chilies and garlic are prepped, it’s time to bring them together. In the bowl of a food processor or a blender, combine the chopped red chilies and the minced garlic. To help with the blending process and to introduce a subtle tang and preservation qualities, add 1 tablespoon of vinegar. You can use either white vinegar or rice vinegar. White vinegar will provide a sharper, more assertive tang, while rice vinegar offers a milder, slightly sweeter profile that is often preferred in Asian-inspired sauces. Next, add 1 tablespoon of olive oil or vegetable oil. The oil helps to emulsify the sauce, giving it a smoother texture and carrying the flavors. If you’re using olive oil, a light or egin extracta-virgin olive oil will work well, but avoid a strongly flavored one that might compete with the chili and garlic. For a neutral flavor, vegetable oil is a great choice. Add 1/2 teaspoon of salt. Salt is essential for enhancing all the other flavors in the sauce. If you’re feeling adventurous and want a touch of sweetness to balance the heat and acidity, you can also add 1/2 teaspoon of sugar. This is entirely optional but highly recommended for a more roundedgin extractavor. Now, begin to process or blend the ingredients. Start on a low speed and gradually increase to high. You’ll want to blend until the mixture is relatively smooth, but it’s up to you how chunky or smooth you prefer your chili garlic sauce. Some people enjoy a bit of texture, while others prefer a more refined, paste-like consistency. Stop and scrape down the sides of the bowl or blender jar as needed to ensure everything is incorporated.
Step 4: Cooking the Sauce for Flavor Development
Once you have achieved your desired consistency, it’s time to cook the sauce to meld the flavors and slightly reduce it. Transfer the blended chili and garlic mixture to a small saucepan. Place the saucepan over medium-low heat. It’s important to cook this over gentle heat to prevent the garlic from burning and the chilies from becoming bitter. Stir the mixture frequently as it heats up. You’ll notice that as it cooks, the vibrant red color will deepen, and the aroma will become wonderfully fragrant, a delightful combination of spicy chili and pungent garlic. Continue to cook and stir for about 5 to 7 minutes. During this time, the excess moisture from the chilies will evaporate, and the flavors will intensify. The oil will also help to coat the chili and garlic particles, creating a more cohesive sauce. Keep a close eye on it; we’re not looking to dry it out completely, but rather to develop the flavors and achieve a slightly thicker consistency. If the mixture starts to look too dry, you can add a tiny splash more of water or oil, but be judicious. The goal is a rich, flavorful sauce, not a paste.
Step 5: Cooling and Storing Your Homemade Chili Garlic Sauce
After cooking, remove the saucepan from the heat. Allow the Homemade Chili Garlic Sauce to cool completely in the saucepan before transferring it to its storage container. This is an important step because hot sauces can create condensation in airtight containers, potentially leading to spoilage. As the sauce cools, its consistency will thicken slightly further, which is desirable. Once it has reached room temperature, carefully spoon the sauce into a clean, airtight jar or container. A small glass jar with a tight-fitting lid is ideal for this. If you made a larger batch, you can also use sterilized canning jars. Properly stored in the refrigerator, your homemade chili garlic sauce should last for at least 2 to 3 weeks. Always use a clean spoon to scoop out the sauce to prevent introducing any bacteria. This delicious homemade sauce is incredibly versatile. It’s fantastic as a condiment for noodles, dumplings, stir-fries, grilled meats, or even spread on toast. You can also use it as a base for marinades or salad dressings. Experiment and discover your favorite ways to enjoy this flavorful creation!
Conclusion:
You’ve now mastered the art of creating your very own Homemade Chili Garlic Sauce! This recipe is incredibly rewarding, offering a burst of flavor that is far superior to any store-bought alternative. The balance of spicy chili, pungent garlic, and subtle sweetness is truly irresistible. I encourage you to give this a try; it’s simpler than you might think and the results are phenomenal. Once you taste this vibrant sauce, you’ll be reaching for it constantly to elevate your meals.
For serving suggestions, this Homemade Chili Garlic Sauce is incredibly versatile. Drizzle it over fried eggs, stir-fries, noodles, dumplings, or use it as a dipping sauce for spring rolls and grilled meats. It also adds a fantastic kick to marinades and salad dressings. Don’t be afraid to experiment!
If you’re looking for variations, consider adding a touch of honey or maple syrup for extra sweetness, a splash of soy sauce or fish sauce for umami, or even a hint of gin extractger for an added aromatic layer. You can also adjust the amount of chili flakes to control the heat level, making it perfectly suited to your preference.
FAQs:
How long does Homemade Chili Garlic Sauce last?
When stored properly in an airtight container in the refrigerator, your Homemade Chili Garlic Sauce can last for up to 2-3 weeks. Ensure no water gets into the jar, as this can shorten its shelf life.
Can I adjust the spice level of this sauce?
Absolutely! The spice level is entirely customizable. To make it milder, use fewer chili flakes or opt for milder varieties like gochugaru. For a spicier sauce, incorporate hotter chili flakes or even a fresh chili pepper into the blend.
Easy Homemade Chili Garlic Sauce Recipe
A simple and flavorful homemade chili garlic sauce, perfect for adding a kick to your favorite dishes.
Ingredients
-
5-6 fresh red chilies
-
4 cloves garlic, minced
-
1 tablespoon white or rice vinegar
-
1 tablespoon olive oil or vegetable oil
-
1/2 teaspoon salt
-
1/2 teaspoon sugar (optional)
Instructions
-
Step 1
Wash and prepare the fresh red chilies. Remove stems and seeds (for less heat). Roughly chop the chilies. -
Step 2
Peel and finely mince the 4 cloves of garlic until almost a paste. -
Step 3
Combine chopped chilies, minced garlic, 1 tablespoon vinegar, 1 tablespoon oil, 1/2 teaspoon salt, and optional 1/2 teaspoon sugar in a food processor or blender. Blend until desired consistency is reached. -
Step 4
Transfer the blended mixture to a small saucepan and cook over medium-low heat for 5-7 minutes, stirring frequently, until flavors meld and the sauce slightly thickens. -
Step 5
Remove from heat and let the sauce cool completely in the saucepan. Once cooled, transfer to a clean, airtight jar for storage.
Important Information
Nutrition Facts (Per Serving)
It is important to consider this information as approximate and not to use it as definitive health advice.
Allergy Information
Please check ingredients for potential allergens and consult a health professional if in doubt.