Jalapeno Popper Cheese Ball-Easy Party Dip
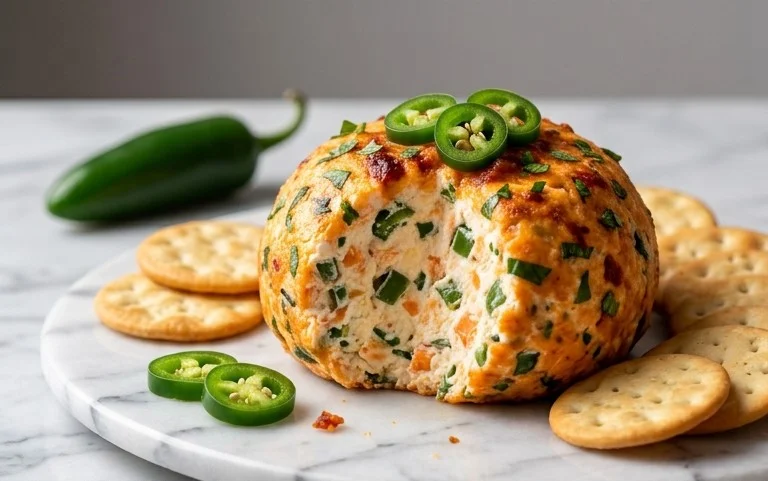
Jalapeno Popper Cheese Ball: Get ready to be seriously impressed! This isn’t just any cheese ball; it’s a flavor explosion waiting to happen. If you’re a fan of those addictive jalapeno popper appetizers, you’re going to fall head over heels for this. We’ve taken all the incredible elements – the creamy cheese, the kick of jalapeños, the savory beef bacon, and the irresistible crunch – and transformed them into a show-stopping centerpiece that’s perfect for any gathering. People absolutely adore this dish because it delivers that familiar, comforting jalapeño popper taste in an easy-to-share, elegant format. What makes this Jalapeno Popper Cheese Ball truly special is the harmonious balance of heat and creaminess, making it utterly irresistible. It’s the perfect companion to your favorite crackers, pretzels, or veggie sticks, promising to be the highlight of your appetizer spread.
Jalapeno Popper Cheese Ball
Get ready to wow your friends and family with this absolutely irresistible Jalapeno Popper Cheese Ball! It’s the perfect appetizer for any gathering, from casual game nights to more festive celebrations. The creamy, tangy cheese base, combined with the spicy kick of jalapenos, the smoky crunch of beef beef bacon, and the fresh bite of green onions, creates a flavor explosion that’s simply addictive. Plus, it’s surprisingly easy to make, meaning you can spend less time in the kitchen and more time enjoying your guests. This cheese ball is a guaranteed crowd-pleaser, so be prepared for requests for the recipe!
Ingredients:
Instructions:
First, let’s get our flavor base ready. In a large mixing bowl, combine the softened cream cheese, sour cream, garlic powder, onion powder, and fresh ground black pepper. Using an electric mixer (handheld or stand mixer with the paddle attachment works best here), beat these ingredients together until they are smooth and well incorporated. You want a creamy, homogenous mixture with no lumps of cream cheese. This step is crucial for achieving that perfectly smooth and spreadable cheese ball texture. If your cream cheese isn’t quite soft enough, you can gently microwave it in 10-second intervals, stirring in between, until it’s pliable but not melted.
Now it’s time to add the bulk of our delicious cheese. To the cream cheese mixture, add 1 ½ cups of the shredded sharp cheddar cheese, half of the chopped crispy beef beef bacon (about 5 slices worth), half of the minced jalapenos (about 1 jalapeno’s worth), and half of the chopped green onions (about ¼ cup). Gently fold these ingredients into the cream cheese mixture using a spatula or a wooden spoon until they are evenly distributed. Be careful not to overmix at this stage; you just want everything to be incorporated without mushing the ingredients too much. You’ll start to see those beautiful flecks of red and green appearing, hinting at the deliciousness to come.
Shape your cheese ball. Once everything is mixed, turn the mixture out onto a large piece of plastic wrap. Use the plastic wrap to help you shape the mixture into a cohesive ball. Gently pat and mold the mixture into a nice, round shape. You can also make it into a more of a log shape if you prefer. Once you have your desired shape, wrap the cheese ball tightly in the plastic wrap, ensuring it’s senon-alcoholic aled well. This will help it hold its shape in the refrigerator. Place the wrapped cheese ball in the refrigerator for at least 2 hours, or until it is firm. This chilling time is essential for the cheese ball to firm up, making it easier to handle and coat.
Prepare your coating. While the cheese ball is chilling, it’s time to get your exterior ready for its glorious transformation. On a shallow plate or in a shallow bowl, combine the remaining ½ cup of shredded sharp cheddar cheese, the remaining half of the chopped crispy beef beef bacon, the remaining half of the minced jalapenos, and the remaining ¼ cup of chopped green onions. Give this mixture a good stir to ensure everything is well combined. This is your flavor-packed coating that will add an extra layer of texture and taste to every bite. If you like a bit more heat, you can add a pinch more minced jalapeno to your coating mixture.
Coat and serve! Once your cheese ball is firm, carefully unwrap it from the plastic wrap. Place the cheese ball in the center of your prepared coating mixture. Using your hands, gently press the coating mixture all over the cheese ball, turning it as you go, until it’s completely covered. Ensure an even coating for both appearance and flavor. You might need to gently pat the coating on to help it adhere. You can also do this by rolling the cheese ball in the coating mixture. Once coated, carefully transfer the cheese ball to your serving platter. For best results, let it sit at room temperature for about 15-20 minutes before serving to allow the flavors to meld and the cheese to soften slightly for easier spreading. Serve with your favorite crackers, pretzels, or vegetable sticks. Enjoy every delicious bite!
Conclusion:
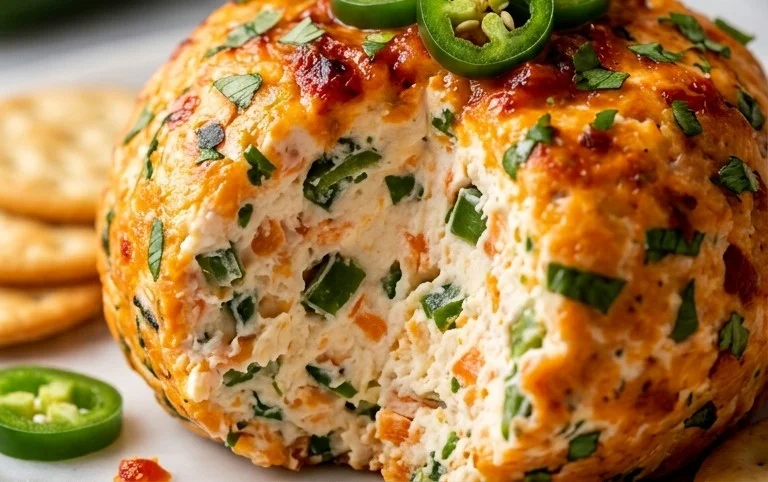
This Jalapeno Popper Cheese Ball is an absolute winner! It’s incredibly easy to assemble, requires no baking, and delivers a flavor explosion that perfectly balances creamy, spicy, and cheesy goodness. The iconic jalapeno popper flavors are captured beautifully in this no-fuss appetizer, making it an instant crowd-pleaser for any gathering, from game days to holiday parties. The delightful crunch of the coating paired with the smooth, flavorful interior is simply irresistible. I encourage you to give this recipe a try – you won’t regret it!
When it comes to serving, this cheese ball shines alongside a variety of dippers. Think sturdy crackers, tortilla chips, pretzel sticks, or even fresh vegetable sticks like celery and bell peppers for a nice contrast. For variations, consider adding a tablespoon of finely chopped cooked beef bacon to the cheese mixture for an extra smoky kick, or experiment with different cheese blends. You could even roll it in a mix of chopped pecans and parsley for a different textural and flavor profile. Get creative and make it your own!
Frequently Asked Questions about Jalapeno Popper Cheese Ball:
Q: How far in advance can I make this Jalapeno Popper Cheese Ball?
You can prepare the cheese ball up to 2 days in advance. Simply wrap it tightly in plastic wrap and refrigerate. Before serving, allow it to sit at room temperature for about 15-20 minutes to soften slightly for easier dipping.
Q: What if I’m not a fan of spicy food?
No problem! You can significantly reduce the heat by removing the seeds and membranes from the jalapenos before chopping them. For an even milder version, you can substitute half of the jalapenos with finely diced bell peppers, or omit them altogether and just use a pinch of cayenne pepper for a hint of warmth without the intense spice.
Jalapeno Popper Cheese Ball
A savory and spicy cheese ball perfect for parties, featuring the classic flavors of jalapeno poppers.
Ingredients
-
2 boxes (8 ounces) cream cheese, slightly softened
-
2 tablespoons sour cream
-
¾ teaspoon garlic powder
-
½ teaspoon onion powder
-
¼ teaspoon fresh ground black pepper
-
2 cups shredded sharp cheddar cheese, divided
-
10 slices crispy cooked pork bacon, chopped, divided
-
2 jalapenos, minced, divided
-
½ cup chopped green onions, divided
Instructions
-
Step 1
In a large bowl, combine the softened cream cheese, sour cream, garlic powder, onion powder, and black pepper. Beat until smooth and well combined. -
Step 2
Stir in 1 ½ cups of the shredded sharp cheddar cheese, half of the chopped pork bacon, half of the minced jalapenos, and half of the chopped green onions. Mix well. -
Step 3
Shape the cheese mixture into a ball and place it on a plate or serving platter. -
Step 4
In a small bowl, combine the remaining ½ cup shredded cheddar cheese, remaining chopped pork bacon, remaining minced jalapenos, and remaining chopped green onions. -
Step 5
Press the reserved cheese mixture onto the outside of the cheese ball to coat. -
Step 6
Chill the cheese ball for at least 30 minutes to allow it to firm up before serving with crackers or assorted bread.
Important Information
Nutrition Facts (Per Serving)
It is important to consider this information as approximate and not to use it as definitive health advice.
Allergy Information
Please check ingredients for potential allergens and consult a health professional if in doubt.