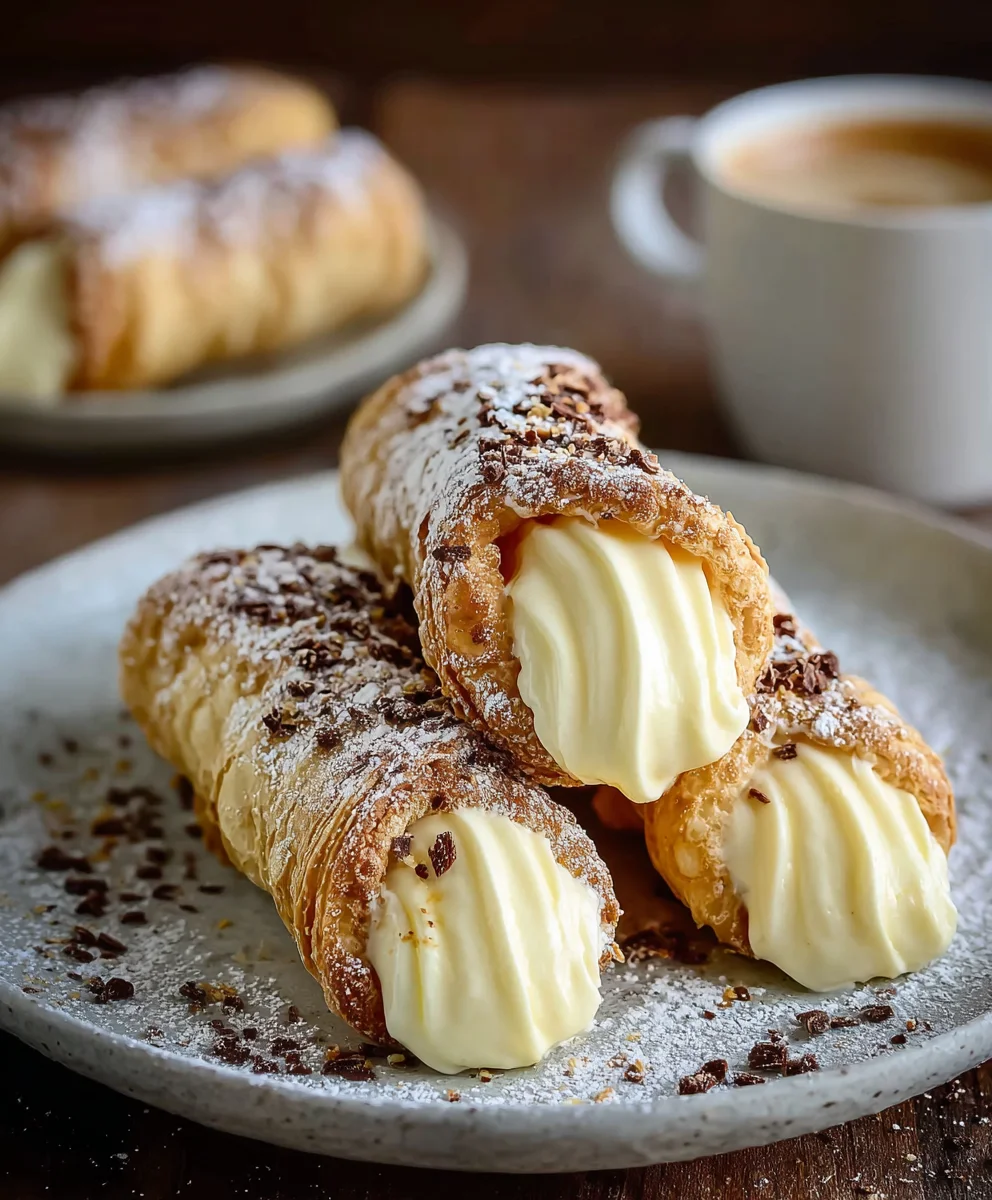
Easy Italian Cream Stuffed Cannoncini Recipe
Easy Italian Cream Stuffed Cannoncini are more than just a dessert; they’re a whisper of Italian sunshine and a delightful crunch of pure joy. Imagin extracte delicate, golden pastry shells, baked to perfection, encasing a velvety, luscious cream filling that melts in your mouth. It’s no wonder these sweet little wonders have captured hearts across generations. What makes Easy Italian Cream Stuffed Cannoncini so utterly irresistible? It’s the harmonious marriage of textures – the crisp, almost brittle shell giving way to the smooth, rich interior. It’s the subtle sweetness that never overpowers, allowing the quality of the ingredients to truly shine. Whether you’re looking for a show-stopping finnon-alcoholic ale to a special meal or simply a moment of pure indulgence, this recipe will guide you through creating these exquisite treats with surprising simplicity, proving that true elegance doesn’t have to be complicated.
Why You’ll Love This Recipe
This recipe demystifies the seemingly complex creation of authentic cannoncini. We break down each step, making it accessible even for novice bakers. The result is a dessert that looks and tastes like it came from a high-end patisserie, yet is entirely achievable in your own kitchen. Get ready to impress your friends and family with these beautiful and delicious Easy Italian Cream Stuffed Cannoncini.
What Makes Them So Special
The magic lies in the contrast. The flaky, crisp puff pastry, when baked just right, offers a satisfying crackle with every bite. Then comes the star: a perfectly balanced, subtly sweet cream filling that is both light and decadent. It’s this exquisite balance that elevates these humble pastries into something truly extraordinary, a testament to the simple brilliance of Italian culinary traditions.
Ingredients:
- 3 large egg yolks
- 3 tablespoons (30g) all-purpose flour
- 1/2 cup (100g) granulated sugar
- 1 teaspoon pure vanilla extract
- 8 fluid ounces (235ml) whole milk
- 1 sheet of puff pastry, fully defrosted (approximately 8 oz/225g)
- 1/4 cup (50g) granulated sugar (for sprinkling)
- 1 large egg, beaten (for egg wash)
- Powdered sugar, for dusting
Preparing the Cream Filling
Step 1: Whisking the Base
To begin extract crafting our luscious cream filling, we’ll start by creating a smooth base. In a medium-sized, heavy-bottomed saucepan (this is important to prevent scorching), combine the 3 egg yolks and 3 tablespoons of all-purpose flour. Add the 1/2 cup of granulated sugar to this mixture. Using a whisk, vigorously beat these ingredients together. You want to ensure there are absolutely no lumps of flour remaining. The mixture should become pnon-alcoholic ale yellow and slightly thickened, resembling a paste. This step is crucial for achieving a silky smooth pastry cream, so take your time and whisk thoroughly.
Step 2: Gradually Incorporating Milk
Once your egg yolk, flour, and sugar mixture is smooth and lump-free, it’s time to introduce the milk. While continuously whisking, gradually pour in the 8 fluid ounces of whole milk. It’s best to add the milk slowly, about a quarter of the way at first, whisking until fully incorporated, then adding more. This gradual addition helps to temper the egg yolks, preventing them from cooking unevenly and forming curds when heated. Keep whisking until all the milk has been added and you have a uniform, liquid mixture.
Cooking the Pastry Cream
Step 3: Cooking the Cream to Perfection
Now, place the saucepan over medium heat. This is where patience and constant attention are key. Continue to whisk the mixture constantly, making sure to scrape the bottom and sides of the pan to prevent any sticking or burning. As the cream heats up, itgin extractll begin to thicken. You’ll notice it start to coat the back of a spoon. Keep cooking and whisking until the cream is thick enough to hold its shape for a few seconds when you draw a line through it with your whisk. This typically takes about 8-10 minutes. Be careful not to let it boil vigorously, as this can affect the texture and flavor. Once thickened, remove the saucepan from the heat immediately. Stir in the 1 teaspoon of vanilla extract for a beautiful aroma and flavor.
Step 4: Cooling the Cream
To ensure the pastry cream cools properly and develops a lovely smooth texture, we need to cool it quickly. Transfer the hot pastry cream into a clean bowl. To prevent a skin from forming on the surface, which can be unpleasant in our delicate cannoncini, press a piece of plastic wrap directly onto the surface of the cream, ensuring there are no air pockets. Let the cream cool at room temperature for about 30 minutes, then transfer it to the refrigerator to chill completely. It should be thoroughly cold, firm, and ready to pipe before we move on to assembling our cannoncini. Ideally, allow at least 2-3 hours for it to chill properly.
Assembling the Cannoncini
Step 5: Preparing and Baking the Pastry
While the cream is chilling, let’s prepare our puff pastry. Preheat your oven to 400°F (200°C). Take your sheet of defrosted puff pastry and gently unroll it onto a lightly floured surface. If it’s a bit sticky, dust your hands and the surface with a little more flour. You want to work relatively quickly so the pastry doesn’t get too warm and soft. Cut the puff pastry sheet into thin strips, about 1/2 inch wide. Take your cannoncini molds (these are cone-shaped metal molds). Lightly grease them if they are not non-stick. Starting from the tip of each mold, tightly wrap a strip of puff pastry around it, overlapping each layer slightly. Continue wrapping until you reach the wide end of the mold, ensuring complete coverage. Once wrapped, place the pastry-covered molds onto a baking sheet lined with parchment paper. In a small bowl, whisk the remaining 1 large egg with a tablespoon of water to create an egg wash. Brush the outside of each pastry-wrapped mold generously with the egg wash. Then, sprinkle the egg-washed pastry evenly with the 1/4 cup of granulated sugar. This sugar will caramelize beautifully in the oven, creating a delightful crunchy exterior. Bake for 15-20 minutes, or until the puff pastry is golden brown, puffed up, and crisp. The sugar should be beautifully caramelized. Once baked, carefully remove the cannoncini molds from the oven and let them cool on the baking sheet for a few minutes until they are warm enough to handle but not too hot. Gently slide the puff pastry shells off the molds. They should come off cleanly if baked and cooled properly.
Step 6: Filling and Finishing
Once your puff pastry shells have cooled completely, it’s time to fill them with our chilled pastry cream. Transfer the cold pastry cream to a piping bag fitted with a star or round tip. If you don’t have a piping bag, you can use a sturdy zip-top bag with a corner snipped off, or even a spoon for a more rustic approach. Generously pipe or spoon the pastry cream into each cooled puff pastry shell. Don’t be shy; fill them until they are plump and inviting. Arrange the filled cannoncini on a serving platter. Just before serving, dust them liberally with powdered sugar. The powdered sugar adds a final touch of sweetness and visual appeal, reminiscent of freshly fallen snow. Serve immediately for the best texture, enjoying the contrast between the crisp, flaky pastry and the smooth, rich cream.

Conclusion:
And there you have it – your guide to crafting the most delightful Easy Italian Cream Stuffed Cannoncini! We’ve walked through each step, from creating the delicate pastry to whipping up the luscious cream filling, and finally assembling these beautiful treats. These cannoncini are more than just a dessert; they’re a taste of Italian tradition that you can easily recreate in your own kitchen. They are perfect for special occasions, a charming addition to a dessert buffet, or simply as a sweet indulgence to brighten your day. Don’t be afraid to experiment and make them your own!
For serving suggestions, these are best enjoyed fresh, allowing the crisp puff pastry to shine against the smooth, cool cream. They pair wonderfully with a cup of espresso or a light, fruity tea.
When it comes to variations, consider adding a hint of lemon zest to the cream for a brighter flavor, or perhaps a tablespoon of finely chopped toasted almonds for an extra layer of texture. You could also drizzle them with a touch of melted chocolate for an extra decadent touch. The possibilities are truly endless with this versatile recipe. Now go forth and bake with confidence!
Frequently Asked Questions about Easy Italian Cream Stuffed Cannoncini:
Can I make the puff pastry from scratch for my Easy Italian Cream Stuffed Cannoncini?
Absolutely! While this recipe uses store-bought puff pastry for ultimate ease, you are welcome to make your own puff pastry if you have the time and inclination. Homemade puff pastry will undoubtedly elevate the texture and flavor, offering an even more authentic experience for your Easy Italian Cream Stuffed Cannoncini. Just ensure your pastry is well-chilled throughout the process for the best flaky results.
How far in advance can I prepare the cream filling for my Easy Italian Cream Stuffed Cannoncini?
You can prepare the cream filling for your Easy Italian Cream Stuffed Cannoncini up to 24 hours in advance. Store it in an airtight container in the refrigerator. It’s important to give it a good whisk before piping it into the cooled pastry shells to ensure a smooth and creamy consistency. Avoid filling the pastry shells too far in advance, as this can make them soggy. It’s best to fill them a few hours before serving.
Easy Italian Cream Stuffed Cannoncini Recipe
A delightful recipe for crispy puff pastry cones filled with a luscious, homemade Italian cream filling. Perfect for a sweet treat or elegant dessert.
Ingredients
-
3 large egg yolks
-
3 tablespoons (30g) all-purpose flour
-
1/2 cup (100g) granulated sugar
-
1 teaspoon pure vanilla extract
-
8 fluid ounces (235ml) whole milk
-
1 sheet of puff pastry, fully defrosted (approximately 8 oz/225g)
-
1/4 cup (50g) granulated sugar (for sprinkling)
-
1 large egg, beaten (for egg wash)
-
Powdered sugar, for dusting
Instructions
-
Step 1
In a medium-sized, heavy-bottomed saucepan, combine the 3 egg yolks, 3 tablespoons of all-purpose flour, and 1/2 cup of granulated sugar. Whisk vigorously until lump-free and resembling a thick, pale yellow paste. -
Step 2
Gradually whisk in the 8 fluid ounces of whole milk, adding it slowly to temper the egg yolks and prevent curdling. Continue whisking until fully incorporated and the mixture is uniform. -
Step 3
Place the saucepan over medium heat. Whisk constantly, scraping the bottom and sides, until the cream thickens enough to coat the back of a spoon and holds its shape for a few seconds when a line is drawn. This typically takes 8-10 minutes. Remove from heat and stir in the vanilla extract. -
Step 4
Transfer the pastry cream to a clean bowl. Press plastic wrap directly onto the surface to prevent a skin from forming. Let cool at room temperature for 30 minutes, then refrigerate until thoroughly chilled (at least 2-3 hours). -
Step 5
Preheat oven to 400°F (200°C). Lightly flour a surface and unroll the puff pastry. Cut into thin strips, about 1/2 inch wide. Tightly wrap each strip around cannoncini molds, overlapping slightly, starting from the tip. Place on a parchment-lined baking sheet. -
Step 6
Brush the pastry-wrapped molds with egg wash and sprinkle evenly with the 1/4 cup of granulated sugar. Bake for 15-20 minutes until golden brown and crisp. Let cool slightly, then gently slide the pastry shells off the molds. -
Step 7
Once the pastry shells are completely cool, fill them generously with the chilled pastry cream using a piping bag or spoon. Arrange on a serving platter and dust liberally with powdered sugar just before serving.
Important Information
Nutrition Facts (Per Serving)
It is important to consider this information as approximate and not to use it as definitive health advice.
Allergy Information
Please check ingredients for potential allergens and consult a health professional if in doubt.