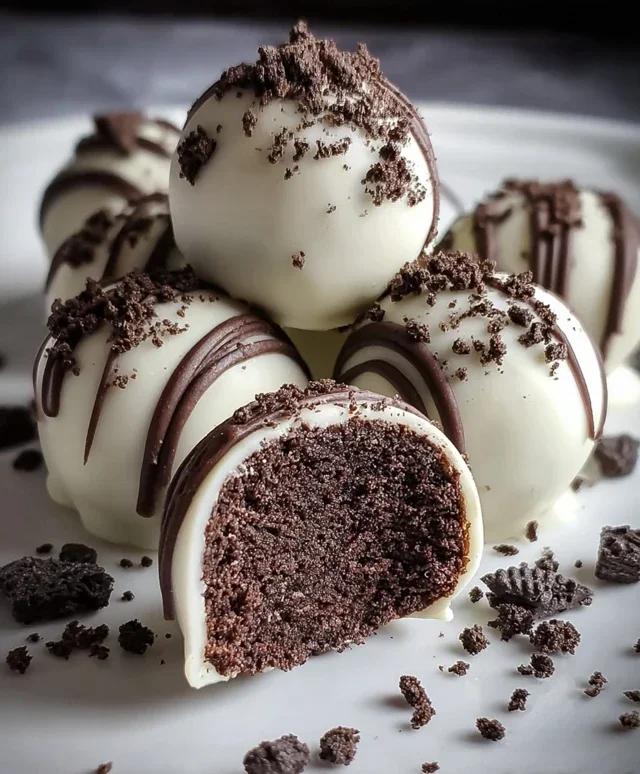
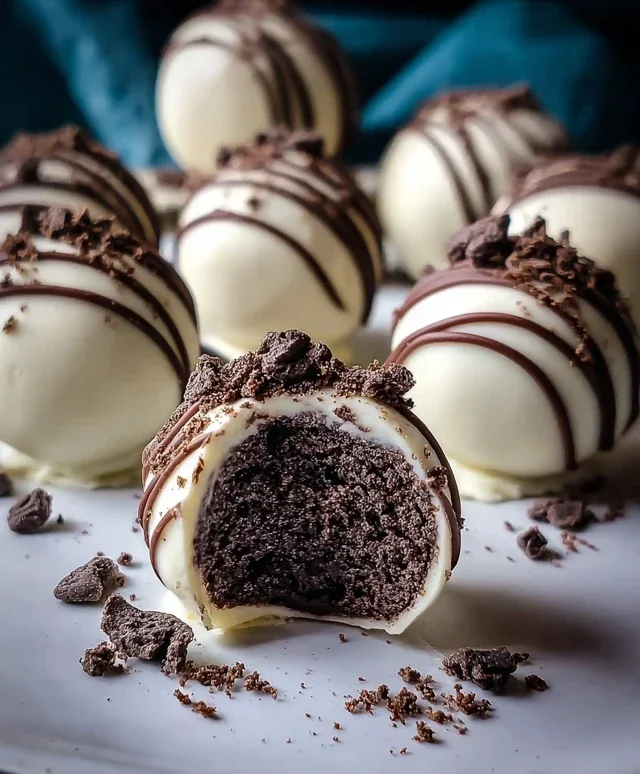
Easy Oreo Cake Balls-Irresistible Treat
Oreo Cake Balls are, quite simply, one of the most delightful treats I’ve ever had the pleasure of making and devouring. There’s a certain magic that happens when you take those beloved cookies and transform them into something even more addictive. What is it about Oreo Cake Balls that makes them so universally adored? It’s that perfect harmony of textures and flavors – the rich, crum extractbly cake infused with that unmistakable Oreo essence, all enveloped in a luscious coating of chocolate. They’re not just a dessert; they’re a miniature explosion of pure joy. Each bite is a decadent surprise, offering a delightful chegrape juicess followed by a satisfying melt. Whether you’re a lifelong Oreo enthusiast or just looking for a show-stoppingly delicious homemade treat, these Oreo Cake Balls are guaranteed to be a massive hit.
Ingredients:
How to Make Delicious Oreo Cake Balls
Get ready to impress your friends and family (or just treat yourself!) with these incredibly easy and decadent Oreo Cake Balls. These little bites of heaven are the perfect no-bake dessert for any occasion, from birthday parties to just a sweet craving. They’re essentially the concentrated essence of an Oreo cookie, elevated with a creamy center and a satisfying chocolate coating. Trust me, once you start, you won’t be able to stop at just one!
The beauty of Oreo Cake Balls lies in their simplicity. You don’t need any fancy baking skills, just a food processor and a little patience for the chilling and dipping process. We’re going to transform humble Oreo cookies and cream cheese into irresistible spheres of joy.
Preparing the Oreo Mixture
The first step to creating our delicious Oreo Cake Balls is to get our cookie base ready. This involves finely crushing the Oreo cookies. The easiest and most efficient way to do this is by using a food processor. Simply place all 24 Oreo cookies (yes, the whole cookies, cream filling and all!) into the food processor. Pulse them until they are completely broken down into fine crum extractbs. You want a texture that’s almost like flour, with no large chunks remaining. If you don’t have a food processor, don’t worry! You can achieve this by placing the Oreos in a large zip-top bag and crushing them with a rolling pin or a heavy can. It will take a little more effort, but the result will be just as good.
Once your Oreos are finely crushed, it’s time to introduce the magic ingredient that binds them all together: cream cheese. Make sure your cream cheese is softened to room temperature. This is crucial because cold cream cheese will be difficult to incorporate smoothly, and you’ll end up with lumps. Add the 4 oz of softened cream cheese to the bowl with the Oreo crum extractbs. Now, pulse the food processor again, or mix thoroughly by hand, until the cream cheese is fully incorporated into the cookie crum extractbs. The mixture should start to come together, forming a thick dough-like consistency that you can easily handle. It will be a bit sticky, but that’s exactly what we’re looking for.
Forming and Chilling the Cake Balls
Now comes the fun part where we start shaping our cake balls! Using a small cookie scoop or your hands, scoop out about one tablespoon of the Oreo and cream cheese mixture. Roll the mixture firmly between your palms to form smooth, compact balls. The size is up to you, but aim for consistency so they bake (or rather, set) evenly. Think of them as slightly smaller than a golf ball. As you form each ball, place it on a baking sheet lined with parchment paper. This parchment paper is important to prevent sticking. You’ll notice the mixture can be a little soft, so working relatively quickly is helpful.
Once all your Oreo mixture has been rolled into balls, it’s time to let them firm up. Pop the entire baking sheet into the freezer for at least 30 minutes, or into the refrigerator for at least an hour. This chilling step is absolutely critical. It firms up the cream cheese and the cookie mixture, making the balls much easier to handle when it comes time to dip them in the candy coating. If you try to dip them before they are properly chilled, they might fall apart, and you’ll have a melty mess on your hands! Patience here will pay off.
Melting and Dipping the Cake Balls
While your Oreo balls are chilling, let’s prepare our white candy melt coating. In a microwave-safe bowl, pour in the 10 oz of white candy melts. Microwave them in 30-second intervals, stirring well after each interval, until the candy melts are completely smooth and pourable. Be careful not to overheat them, as candy melts can seize up and become unusable if they get too hot. If the candy melts seem a little thick after melting, you can add the optional 2 tablespoons of heavy cream, one tablespoon at a time, stirring until you achieve a smooth, drizzle-able consistency. This will make dipping much easier and ensure a nice, even coating on your cake balls.
Now that your Oreo balls are firm and your candy coating is perfectly melted, it’s time for the dipping! Take a chilled Oreo ball and carefully drop it into the melted white candy coating. Use a fork or a toothpick to gently turn the ball, ensuring it is completely covered in the coating. Once coated, lift the ball out of the candy melt and tap the fork gently against the side of the bowl to allow any excess coating to drip off. This will help create a clean and polished finish. Carefully place the dipped cake ball back onto the parchment-lined baking sheet. Repeat this process for all of your chilled Oreo balls. Work quickly but carefully, as the candy coating will start to set.
Decorating and Finishing Touches
As you dip each cake ball, it’s the perfect time to add some extra flair! While the white candy coating is still wet, sprinkle the tops with crushed Oreo cookie crum extractbs. This adds a beautiful textural contrast and reinforces that delicious Oreo flavor. You can be as generous or as light with the sprinkling as you like.
Once all your Oreo cake balls are dipped and sprinkled, you have the option to add even more visual appeal with a drizzle of semi-sweet chocolate. Melt a small amount of semi-sweet chocolate chips in a separate microwave-safe bowl (using the same method as the candy melts). Transfer the melted chocolate to a piping bag or a zip-top bag with a small corner snipped off. Drizzle the melted semi-sweet chocolate over the white-coated Oreo balls in a decorative pattern. This creates a classic and appealing look.
After decorating, let the Oreo Cake Balls sit at room temperature for about 15-20 minutes, or until the coating is completely set. For a firmer set, you can place them in the refrigerator for about 10-15 minutes. Once set, they are ready to be enjoyed! Store any leftovers in an airtight container at room temperature for a few days, or in the refrigerator if you prefer them chilled. These Oreo Cake Balls are sure to disappear quickly!
Conclusion:
So there you have it! You’ve just unlocked the secret to creating irresistible Oreo Cake Balls, a treat that’s as fun to make as it is to devour. This recipe truly shines because it takes the beloved flavor of Oreos and transforms it into a bite-sized confection that’s perfect for any occasion. Whether you’re a seasoned baker or just starting out, these delightful morsels are incredibly forgiving and yield impressive results. They’re wonderfully versatile, making them ideal for parties, potlucks, or simply as a special homemade indulgence. Imagin extracte the delight on your guests’ faces when they bite into these rich, chocolatey spheres! Don’t be afraid to experiment with different coatings and decorations to personalize your Oreo Cake Balls. I encourage you to gather your ingredients and give this recipe a try – you won’t be disappointed!
Frequently Asked Questions:
Can I make these Oreo Cake Balls ahead of time?
Absolutely! Oreo Cake Balls are a fantastic make-ahead treat. Once they’ve set in the refrigerator, you can store them in an airtight container for up to a week. This makes them perfect for busy hosts or for prepping for a special event in advance.
What are some other coating ideas besides chocolate?
The possibilities are endless! Besides milk, dark, or white chocolate, you could try a colorful candy melt, a cream cheese frosting, or even a dusting of powdered sugar. For an extra special touch, consider rolling them in sprinkles, crushed Oreos, or even finely chopped nuts after coating.
My cake ball mixture seems too crum extractbly. What can I do?
If your mixture is too crum extractbly, it likely needs a little more moisture. You can add a tablespoon or two of milk, softened cream cheese, or even a bit of melted butter, mixing it in gradually until the dough holds together easily when pressed. Be careful not to add too much, or it might become too sticky!
Oreo Cake Balls
Delicious and easy-to-make Oreo cake balls, perfect for parties or as a sweet treat.
Ingredients
-
24 Oreo cookies (regular size, about one standard package)
-
4 oz cream cheese, softened
-
10 oz white candy melts
-
2 tablespoons heavy cream (optional, only if needed to thin candy coating)
-
Crushed Oreo cookies for sprinkling
-
Semi-sweet chocolate chips for drizzling
Instructions
-
Step 1
Crumble the Oreo cookies in a food processor until fine crumbs form. -
Step 2
In a medium bowl, combine the Oreo crumbs with the softened cream cheese. Mix until well combined and a dough-like consistency is formed. -
Step 3
Roll the mixture into small balls, about 1 inch in diameter. Place them on a baking sheet lined with parchment paper and chill in the refrigerator for at least 15 minutes. -
Step 4
Melt the white candy melts according to package directions, either in the microwave or a double boiler. If too thick, stir in heavy cream, 1 tablespoon at a time, until desired consistency is reached. -
Step 5
Dip each chilled Oreo ball into the melted candy coating, ensuring it’s fully covered. Allow excess to drip off. -
Step 6
Place the coated balls back on the parchment-lined baking sheet. Immediately sprinkle with crushed Oreo cookies while the coating is still wet. -
Step 7
Melt semi-sweet chocolate chips and drizzle over the cake balls using a fork or piping bag. -
Step 8
Let the candy coating and chocolate drizzle set completely. You can speed this up by refrigerating for a few minutes.
Important Information
Nutrition Facts (Per Serving)
It is important to consider this information as approximate and not to use it as definitive health advice.
Allergy Information
Please check ingredients for potential allergens and consult a health professional if in doubt.